You can design templates for lettering to use in name drops, word walls, subway art, etc. Templates are interactions between two different elements: A Lettering Design, and a template object (or objects). To accommodate multiple template designs on a page, the template and lettering items are named using a numbering system that will match them together.
The lettering works with the built-in fonts from Essentials, Embrilliance Font Collections or any of the .BX fonts that you have installed. The way it works is to start with an “Envelope” object. This is a Line Object with a closed shape, like a rectangle. The object requires a name, “Envelope” with a number like “Envelope 1”, “Envelope 2”, etc. The number is an index so that you can match lettering objects to their envelopes. When naming your lettering designs, give them a matching number at the beginning of their name, for example, “1 Letter”, “2 Letter”.
Note on the use of .BX-installed fonts:
The fonts installed usually are stitch files, which means that they will not have their stitches recalculated without a product installed which supports it. You may want to add additional titles in order to use lettering in this way.
The envelope object must be in a design that comes before the lettering design. When the lettering design gets updated, it looks backward to see if there is a matching envelope for it to use.
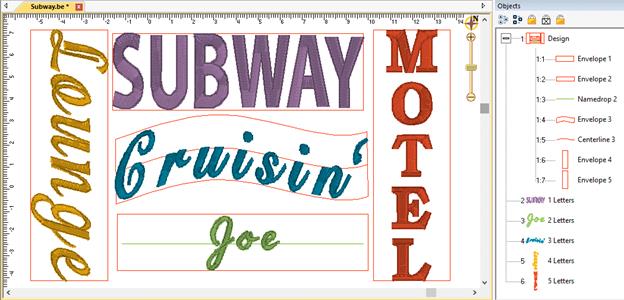
When doing filled rectangular areas such as typical in subway art, all you need is the envelope. The Envelope can be vertical or horizontal. In the vertical examples in the image, the difference with the word, “Lounge” and “Motel” is that the lettering design for “Motel” was set to vertical using that monogram quick style.
If you want to have your text curve, as with the “Cruisin’ example, you need to add a line object called, “Centerline” with the index number matching the envelope to which it will belong. The centerline width also sets the text width, so you can have your centerline slightly narrower than the envelope, which can be useful if you’ve copied the envelope from stitch objects.
The centerline object should be vertically centered in the envelope as shown. You can add some text, and adjust the centerline until you’re happy with it – to regenerate the text, simply select the letter object and click ‘Set’ in the letter properties. Note that if you’re in Design Creation mode, you won’t be able to click on the lettering, but you can still select the text using the Object View.
If you want to create an un-stretched design as shown with the word “Joe” above, change the name of your centerline to “Namedrop” followed by the index number. This works like the centerline, but does not stretch the word horizontally. You can justify the namedrop by adding “LJ” or “RJ” to the object name. For example, “Namedrop 1 LJ” will justify the word to the left of the centerline.
Note: For a single line, normal namedrop, you can simply make a lettering object, using the multi-line text field with a single line of text. This will allow you to change the text, but retain justification and baseline. That feature is part of the platform, and you do not need an envelope for it.
As in the image, you can (and probably should) place all your template objects in one design. As long as that design comes ahead of the lettering designs, the template items will be found. You do not need to have the designs in any order – the sequence for stitching should be how you want it, and you use the sequence of the lettering designs to control the sewing order. All that matters is that the index numbers in the names match.