Editing paths with Bezier handles exposed is not hard, and is very intuitive once you get past the first few minutes or so.
Editing is accomplished by dragging the handles, which adjusts the curve as you drag. You can also drag the outline itself into place, which will adjust the handles for you. When dragging the outline, the closer you are to a node, the more that node’s handle will be adjusted, rather than the one you are farther away from. Because this can make your handles go ‘wild’ we do not let the outline drag if you grabbed it within 5% of the ends of the outline in either direction. It is best to grab the curve somewhere in the middle and drag it, then adjust the handles to perfect the shape.
Note: Sometimes art will have the handles ‘hidden’ under the nodes. Drag the outline and the handles will move, exposing them so you can drag them around as needed.
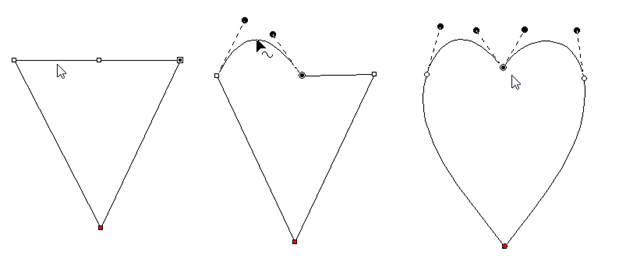
Here’s a step-by-step example of making use of minimal nodes while drawing, and good use of re-shaping: Make a heart, starting at the bottom, using all Cusps (Shift key). You only need four points! Ctrl-right-click to close the outline:
Next, hover your mouse over the curve in between the top left two points as shown, and drag the curve up. You will see the shape beginning to appear. Repeat the drag for the other side. In the example above, we’ve made the sides smooth too. Do any editing desired for the overall image, and you have a low-node-count shape that looks great!
There are also some tricks that we would like to share.
Trick 1: A favorite old movie of ours, Ghostbusters has the line, “Don’t cross the streams!” In the movie, it implied that ‘Bad Things’ could happen. What we’re saying here is, “Don’t cross the handles.” It’s not that you cannot cross the handles – you can – but certain object types will not understand what it is you’ve done. So we discourage it.
Trick 2: Another thing to consider is that the handles should generally be in the direction of the travel of the path. If you have your handles pointing away from the travel of the stitches, then the stitches may do a “Two-Step” which you might not want to happen.
Trick 3: Sometimes you will inadvertently wind up with a handle hidden under the node it is attached to: it is a handle with no length. You can recover these by mousing-down in the middle of the curve and dragging the outline, which reorients the handles for the curve you are dragging. Once the handles are exposed, you can position them as needed.
Trick 4: Use nodes where the path switches from turning left-to-right or vice versa. And then when turning, place a node at the ‘widest’ point in the turn if you need an additional node. If you have extras, you can delete those and adjust as desired.