Fills can have curved rows of stitching, not only straight ones. Switching to a curved fill is done with the “Curved” checkbox. When you select the fill to be curved, a curved line, similar to a break line, will be created for you automatically, and it will be angled as your inclination was previously.
You adjust the curve as you would with any line. You can add points and remove them. The curve is fully adjustable, but realize there are some rules you should follow.
1. The endpoints of the curve should go past the edges of the shape.
2. The curve needs to be simple – making a loop may be fun, but it won’t be nice to sew.
3. Hard turns will give you areas of low density on the angle, and high density as they straighten out, so use things like that with low density as second fill, for texture and dimension.
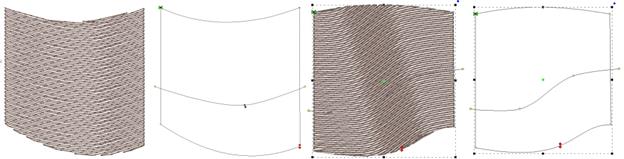
Here are some examples of curving fills in action. The stitches and the outline are shown side-by-side for each. Notice the curve on the right has an additional node added to produce an ‘S’ curve:
When you click off the curved fill, the line will be replaced with an inclination.