 Before we can discuss the input methods of satin columns, we need to
go over incline lines.
Before we can discuss the input methods of satin columns, we need to
go over incline lines.Before we can discuss the input methods of satin columns, we need to
go over incline lines.
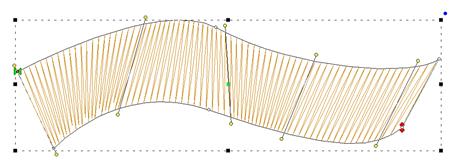
When you have a shape drawn that will be a Satin Column, you will need one or more incline lines, also called, “Inclinations.” When you first draw the shape, the program attempts to provide a satin stitch automatically, based on the shape. If this is acceptable, you can skip adding your own.
The incline lines input can be started using the ‘i’ key or the Inclines button on the Tool Pane. To add an incline line, simply begin on one side of the shape by clicking down, and then drag the mouse across the shape to the other side. When you release the mouse button you will have added an inclination line to the shape. You can repeat this drag operation to make as many incline lines as the shape requires. When you are finished, simply right click to exit the mode.
How many incline lines do you need? That is a great question, and like a haircut the answer lies in the form of a question, “How does it look?” Simple lines of satin stitching might only need one or two inclines. But if you curve around, you’ll need one whenever you make a quarter-circle, or whenever you want to switch from turning left-to-right or vice-versa.
Generally, start with a pair of inclines at the ends, and at least one in the middle. As you add inclines, you will see the stitches change. You can stop anytime you are happy.
If you make a mistake, you can exit the Inclines mode, and then simply drag the endpoints of your inclines around. You can also drag one of the points to the opposite side to remove the incline. You can also go back and add, remove or move the inclination lines at any time, which is handy if you decide you need to edit the shape later.
When a shape turns, one side will be longer than the other. This means that one side will have its stitches closer together than the other. Another way to say this is that the density (stitches per inch) inside the turn is higher. When the satin stitch is created, it is given a specific density to maintain – and that is on the outside of the turn, not the inside. The program will do things on your behalf, such as short-stitching, to minimize the impact of the increased density on the inside of turns. But you can also help by looking at what is going on, and making changes to the inclinations so that the density increase is minimized.
Tip: When turning around a tight corner, you might want to begin ‘leaning’ into the turn, which helps the stitches go around with less bunching:

Another issue to look at when adding, or adjusting, inclinations is smoothness of the change in angle. You don’t want your inclinations to be ‘wobbly’:
When going ‘around’ a large curve, imagine a center point, and incline as if there were rays radiating from that center point:
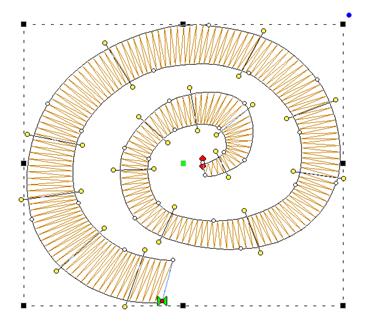
The smoother you change the angle in your satin objects; the smoother the sewn result will appear.