 When
a shape is drawn, it goes from one node to another. It can either form a
straight line to the next node, or it can form a curve going ‘through’ that next
node on its way to the one that follows. The advantage of curves is that when
you scale the design up in size, the result is a nice smooth outline. If you
draw with all ‘lines’, as many have done in the past, you are severely
restricting the useful size of the outline you are creating. For this reason, we
normally draw with curves, and you can switch to a line as you enter points (for
example by holding the ‘ctrl’ key) or you can do it after the design is
created.
When
a shape is drawn, it goes from one node to another. It can either form a
straight line to the next node, or it can form a curve going ‘through’ that next
node on its way to the one that follows. The advantage of curves is that when
you scale the design up in size, the result is a nice smooth outline. If you
draw with all ‘lines’, as many have done in the past, you are severely
restricting the useful size of the outline you are creating. For this reason, we
normally draw with curves, and you can switch to a line as you enter points (for
example by holding the ‘ctrl’ key) or you can do it after the design is
created.
If you think about it, straight lines are not ‘natural’ except
in math; only people create things in the real world with perfectly straight
lines. So curves and cusps are very useful, unless of course you are making a
geometric design.
Notes: ‘Curved’ and ‘Line’
node types refer to the path coming toward the node. The path leaving the node
is controlled by the following node.
A ‘Cusp’ allows two
curves to go in different directions away from a common node, whereas a ‘Curved’
node creates a smooth line through the node, transitioning between the two
curves smoothly.
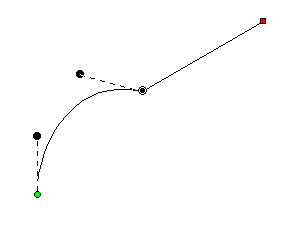
Here is an
example of a curved node in the middle, and a hard point at the end. See how the
path is a flat line going toward the final point. The path shape is defined by
the node it is going toward.
A straight line does not have handles. There is no need, as
there is nothing to adjust. If you want to make it curve, change the node
type.
On any path, there is a green node that indicates the start,
and a red node that indicates the end of the path. A closed shape will naturally
have the end positioned over the start, so it appears red.