 Satin stitches are good at covering the fabric, but they have
challenges, especially along the edge, where tightly placed dense stitches can
penetrate the same hole in the fabric or even cut the fabric. You may have sewn,
for example a knit shirt, and had the edges of satin stitches create holes in
the fabric. For this reason a parallel or zigzag underlay is often used. It
provides coverage while pulling the fabric at slightly different angles and that
can allow the top stitching to have reduced density.
Satin stitches are good at covering the fabric, but they have
challenges, especially along the edge, where tightly placed dense stitches can
penetrate the same hole in the fabric or even cut the fabric. You may have sewn,
for example a knit shirt, and had the edges of satin stitches create holes in
the fabric. For this reason a parallel or zigzag underlay is often used. It
provides coverage while pulling the fabric at slightly different angles and that
can allow the top stitching to have reduced density.
Satin also has the issue of tension. Short stitches in the
same direction, laid next to each other, builds up stress in the fabric,
gathering it in toward the middle of the satin stitch. This can cause
registration issues with subsequent stitching. This can be managed by binding
the stabilizer to the middle of the satin with a center run, or a pair of edge
runs that travel just inside the shape. The edge runs also have the added
benefit of lifting the edges of the satin up, out of the pile of the fabric. For
these reasons it is not uncommon to use a medium density satin with a lot of
underlay.
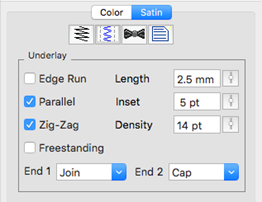
In the underlay properties, the “Edge Run” will create runs on
either side of the satin, just inset by an amount controlled by the Inset field
on the property page. The inset for the edge run is usually is set to fall just
inside the stitching – perhaps a half-needle with or slightly more, which allows
some relief around tight corners. The stitch length of the edge run is also
adjustable; use smaller stitches for tight, narrow columns and longer ones if
you want to reduce the stitch count, or are worried about cutting the fabric.
The default is usually sufficient though.
The density of the parallel and zigzag underlay is adjustable
for increased coverage. Sometimes it is better to have a higher density underlay
(0.8 – 1.2mm) and a lower density top stitch (0.8mm) so that the coverage is
solid, but the pull on the fabric is reduced, which helps with registration
issues (eliminating gaps between stitched areas).