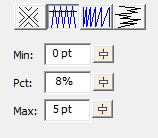
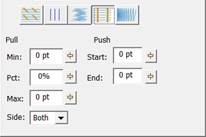
Left: Level 1 & 2, Right: Level 3
You can use a minimum value, usually 0 – 3 points, depending on what the fill is lined up against. If your fill has a wide difference in the width of the runs, in other words some narrow parts and some fatter parts, you may want to use a percent for the compensation. We suggest keeping it a small value, 2-3%. It will be kept in check by the Max value though, even if you use a high percentage.
While the compensation numbers sound like something you should use, they’re really there more for the professional who uses them all the time. Most of the time, simply adjusting the shape to overlap anything that neighbors it will do a fine job of handling registration issues.
The Side control in level 3 allows for control of which sides the compensation will extend. Sometimes, a shape has been compensated under another shape enough not to compensate it on one side, leaving the other side open and needing some extra stitch length.
Push compensation will shorten the end of the column, as thread tends to expand fabric along the line of the column, leading to registration difficulties, particularly with outlines. Use push compensation very sparingly.