 If
you have a Husqvarna Viking Designer machine that uses either a USB stitch or a
3.5” diskette, you can create the proper files and file structure via Utility
-> Designer 1 Disk Utility.
If
you have a Husqvarna Viking Designer machine that uses either a USB stitch or a
3.5” diskette, you can create the proper files and file structure via Utility
-> Designer 1 Disk Utility.If
you have a Husqvarna Viking Designer machine that uses either a USB stitch or a
3.5” diskette, you can create the proper files and file structure via Utility
-> Designer 1 Disk Utility.
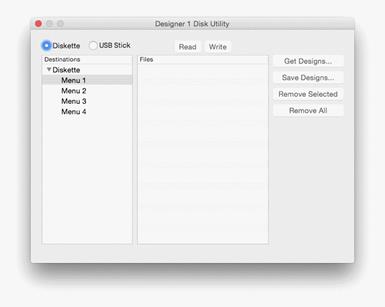
When the Designer 1 Disk Utility window opens, you choose whether you want to write to a diskette or a stick. Next, choose the menu you on which you want to store the designs. Designs are imported to only one menu at a time.
Note: If you want to add files to a previously created Designer diskette or stick, you will need to first read in the designs and then add the new files to one of the menus. When a Designer disk or stick is written, it replaces any matching file and folder names.
Click the ‘Get Designs…’ button and navigate to the desired designs. You’ll see the now familiar ‘Get Designs’ window where you select individual designs or the entire folder to import.
Note: Each menu can store up to 36 designs. If you select more than that to import, only the first 36 will be imported.

The designs are imported with their original file names and file types at this point. To finish the process, click the ‘Write’ button. Navigate to the desired destination and click ‘Select Diskette.’
Similarly, Designer diskettes and sticks can be read into Embrilliance by clicking the ‘Read’ button.

When you view the newly created Designer 1 media, you’ll see the files are renamed appropriately and all the necessary support structure is also created.
Tip: You are not required to write to an actual diskette. If you create folders ahead of time, you can actually “write the diskette” into a folder on your hard drive for copying onto a diskette later.