Cross Stitch objects create patterns of crosses in filled objects and on outlines to resemble handwork.
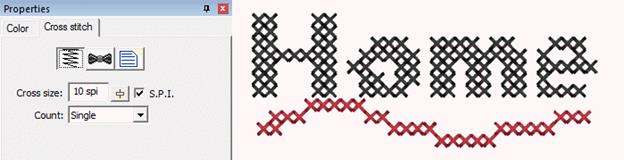
The cross size is available in metric and Stitches per Inch (SPI). Stitches per inch settings are not exactly duplicable in normal metric stitch points – and the result is obvious if stitched on Aida cloth which is woven at densities of SPI. Therefore you have your choice of how the cross size works.
When creating a cross, each leg of the cross is stitched twice. Sometimes you will want more thread, for example when using large crosses, and you can adjust the count setting accordingly. Realize that increasing the pass count will have a dramatic effect on the stitch count.
The cross stitches for all cross stitch objects are made on a default grid of ‘cells’. This allows the stitching of adjacent object shapes to line up. We think of each of these cells as either ‘off,’ meaning no cross, or ‘on’ meaning a cross will be stitched.
When creating outlines with closed shapes, only the cells that have their center within the shape will be set to cross. If you make a shape that appears to ‘miss’ a cell, and you want to make it appear, it is normal to adjust the outline shape accordingly. When adjusting the shape to turn on (or off) a cell, we suggest adding one or more line nodes to the outline (ctrl key while clicking in point mode.) We also suggest using the Spline mode for point entry because it can make it easier to insert points to grab specific cells.
When creating crosses with an open object, whichever cells are intersected by the line are turned into crosses.
If you move an object, the crosses will move with it. Once moved, you may want to re-generate the object (touch a property or outline node) so that the correct crosses, exactly on the grid, will be generated.