
In the Preference window, under Environment, you can choose a hoop. Hoops are displayed in a sorted list, organized by embroidery file format. Most embroidery hoops are made using the metric system, so the sizes for the hoops are displayed according to the way the manufacturer sells the hoop. An approximate size in inches is also shown.
There are many hoops that are built into the program, and you can add your own. As the program updates over time, or if you have edited a hoop, use the “Defaults” button to restore the program to the hoops provided. The “Default” button will not, however, remove any hoops you’ve added yourself.
Optional by product: Depending on which products are licensed, some multi-position hoops may be listed – they have “Multi” listed after the size. Designs will automatically split upon the Save and a text file will be created with the stitching instructions. See the section on “Multi-position Hoops” for more information.
Many times you will want to sew a design sideways in the hoop. But rather than laying out your design sideways, it might be convenient to have the hoop displayed as rotated. Checking the “Rotate 90” button accomplishes this. Double-click the hoop indicator on the status bar to rotate the hoop 90°.
You can create hoops
and edit hoops too. If you use the word, “Round” or “Oval” in the name, your
hoop will be drawn using that shape. When you create a new hoop, it will
become
the selected hoop. If you have added a hoop, or if you decide to have the program display only the hoops that you own, you can delete hoops from the list, using the “Delete” button.
The width and height fields are self-explanatory, and you can name your hoop as desired. Hoop names should be unique.
Note: Do not create a hoop that is bigger than the sewing field of your embroidery machine.
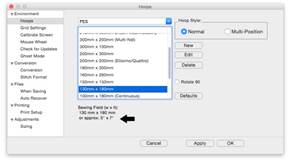
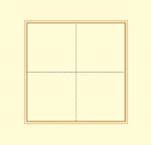
Left: Hoop selection. Right: What a hoop looks like in the Main View.
When you create a new hoop or modify an existing hoop, you are really defining the embroidery field, not the physical dimensions of the hoop. You must know your machine’s embroidery field as you cannot use a hoop that is larger than what your embroidery machine can sew, unless you are creating a multi-position hoop, which we’ll discuss separately in the Multi-Position Hooping section.
Check the status bar at the bottom of the window for hoop information, which displays the selected hoop size whether it is visible or not. Zoom out to find the hoop (if it isn’t hidden by your design).
Note: If your program is licensed to use it, there is one hoop, the .PES Jumbo 14” hoop, is shown in both the Normal and Multi-Position section of the Hoop Preference. Using either selection will create the correct file for use with this hoop, however, the Normal version displays it as a single sewing field, and the Multi-Position version shows both fields in use.