 Motif Run ObjectsMotif Run Objects
Motif runs use patterns of stitching along a path, much like the decorative stitches of a sewing machine.
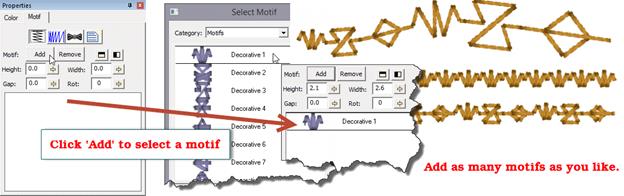
When you initially set an object to a Motif run, it will only have normal run stitches in it. You will need to add a motif to the run. Click the ‘Add’ button and the Motif Selection window appears.
Once you have selected a motif, for the run, the run will re-generate with the motif. The motif will also appear in the list box in the bottom of the property page. You can add as many motifs as you like, and they will be added to the sequence in the order that you add them. Each motif has its own properties that you can adjust. Select the motif in the list to adjust its properties. You can remove a selected motif with the ‘Remove’ button, next to ‘Add’.
 The
height, width and rotation of the motif are set as their name implies. The
mirror buttons will flip the motif in the sequence. You might want to have two
copies of a motif ‘facing each other’. This can be done by adding the motif
twice to the list, and then flipping one. The ‘Gap’ of the motif indicates that
some amount of space should precede the motif, after the previous one.
The
height, width and rotation of the motif are set as their name implies. The
mirror buttons will flip the motif in the sequence. You might want to have two
copies of a motif ‘facing each other’. This can be done by adding the motif
twice to the list, and then flipping one. The ‘Gap’ of the motif indicates that
some amount of space should precede the motif, after the previous one.
The Motif Scaling button allows you to incrementally adjust the size of each motif in the run. This makes for a decorative effect. If you increase the size, start with the motifs all at a regular or small size in the Height and Width fields. Then you can add a few percent of size for each pattern that is displayed. If you want to create your run with motifs decreasing in size, start with the motifs’ height and width as large as you will want, and decrease will make each successive pattern smaller. This may take some trial and error to get the result, but the effort is worth it, especially if you want to run ‘center-out’ and have motif run scaling in both directions.