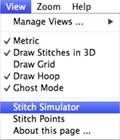
The Stitch Simulator lets you see how the design will sew out by sewing on the screen. It is activated by clicking the Stitch Simulator tool in the View tool bar or selecting Stitch Simulator from the View menu.

Stitch Simulator controls

Stitch Simulator Controls
The controls are easy to use and give complete control of the simulated sewing process.
Player Control: This control lets you sew forward, backward and stop. The right arrow starts sewing forward. The double bars stop sewing. The left arrow starts sewing backward.

Step Stitch Control: This control lets you sew one stitch at a time forward or backward. Right arrow: forward, Left arrow: backward.

Speed Control: Use the slider to change the speed of sewing. Move to the left for slower or to the right for faster.

Manual Control: Click and drag this slider forward or backward to quickly move to a particular section of the design.

 Insert Color Stop: Click the Stop button to insert a color
stop in the design. This allows you to change colors on the fly. Or creatively
use this to isolate parts of the design that you want to remove or isolate. When
you insert a stop, the color window will appear to let you pick the color you’re
changing into. Make sure you pick something different. Once you have picked a
color, the Stop command will be inserted in the stitches at the point of the
simulator, and the new color will appear in the Object view.