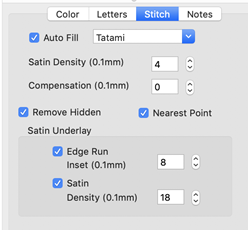
The Stitch tab contains controls for the actual stitch generation of the Lettering.
Note: This is the tab for built-in fonts. See below about imported fonts.
Satin Density Control: This control ranges from 3 to 20 with each tick representing 0.1mm. So the range in millimeters is .3 to 2.0 mm. The smaller the density number the closer together the satin stitches will be. Normal is 0.4mm.
Compensation: This control ranges from 0 to 10 with each tick being .1 millimeter. As the value increases the stitch length increases, in effect ‘fattening’ the stitching. This is useful on fabrics that have a loft or nap, and can also be used to make a font appear bolder.
Remove Hidden: When selected, stitches that are completely hidden by top stitches will be removed. This process allows the design to sew with less density. Note that this only affects stitching within the monogram itself, for instance where one letter is positioned on top of another letter.
Nearest Point: When this is available, it allows the lettering to adjust the entry and exit points for each letter to minimize travel to its neighbors. This will also work for alternate sewing sequences such as center-out or right-to-left. Not all fonts have this ability, so it is up to the digitizer.
Edge Run: When checked, this adds a running stitch underlay. This setting is the amount of inset for the edge run and ranges from .1 to 1.2 mm. A normal edge-run amount is 0.8mm (about the width of a typical needle)
Satin: When checked, this adds a satin underlay. When checked, it applies the density value, which ranges from .3 to 2.0 mm just like the satin stitch.
The Set Defaults button restores each of these controls to their default values.
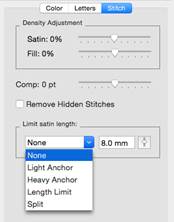
Note: This is the Stitch tab for imported fonts with a licensed product such as Essentials.
Imported fonts are really just merged stitch files, with a few extras built-in for alignment. These fonts may have been added using a .BX-format installer or with the Import Font window if you have a product such as AlphaTricks.
Because the stitches already exist at whatever density the digitizer created them with, all you can do to the density is modify it – and you do that with a percentage. Likewise, if any of the stitches are recognized by the program as fills, we can adjust the percentage of the density here too. Sliding the sliders right, for example to 10% will add 10% more stitches, while keeping the size of the lettering the same. More density provides more coverage, but too much density sews thick and noisy and can pucker the fabric.
The compensation tool, “Comp,” is used to slightly fatten the lettering. This can be useful for a better look on the font if it is too thin or is being sewn on a pile fabric. If you make the font too fat though, you can move to far from any edge run that may exist, which would alter the look at the edge of the satin.
The Remove Hidden Stitches function allows you to position one letter on top of another and have the program remove hidden stitches underneath. This also works with applique lettering, where the top-stitch will be removed, but Position and Material runs will be left intact.
The ‘Limit Satin Length’ option is used to help prevent looping on top of the fabric and reduce ‘snag-ability’ from long satin stitches. There are several options to choose from when the lengths are long. An ‘Anchor’ is a simple run that’s placed every other line of stitching. This allows the alternating satin strokes to cover the added needle penetrations. The result is a reasonably smooth stitch, almost as smooth as a satin, but well tacked down, and not likely to snag or loop. ‘Length Limit’ is one traditional look to anchor the satin, and it will simply drop the needle whenever the stitch is too long. ‘Split’ will insert a needle land in the middle of any stitch that’s too long, which results in the look of a split-satin, or columnar appearance.