 Making
patches has been common since Roman times, at least. From garment repair to
military insignia to fashion item, the humble patch has been with us and will
continue to be part of our wardrobe culture for the foreseeable future. You may
also have heard of patches called emblems or crests: They’re synonyms.
Making
patches has been common since Roman times, at least. From garment repair to
military insignia to fashion item, the humble patch has been with us and will
continue to be part of our wardrobe culture for the foreseeable future. You may
also have heard of patches called emblems or crests: They’re synonyms.
Standard technique for patch production today is to use an
embroidery machine or sublimation to put the design on the patch, usually made
of twill, then the patch is taken to an overlock machine to have its edges
finished.

Some common patch shapes
Sometime in the mid-19th century, the Merrow
company, under a couple names, headed by Joseph Merrow, began producing overlock
machines. About the same time, Wilcox and Gibbs also produced similar overlock
machines. Both brands survive today, however, the term merrowing has been used
in the patch production industry for all recent memory. For those curious about
history and the history of textiles, look those companies up as they’ve both got
some great stories in their past.
A merrowed border is a three-thread overlock. Like a serger,
but without having the machine cut as it goes. It gives patch edges their
distinctive look, with the fan-shaped edge rolling over to the back of the
fabric, and the top needle’s apparent chain stitch.
To simulate a merrowed look, some have resorted to using a
motif that resembles the fan-and-chain. It’s okay but lacks the ability to
handle shapes that are complex. Turning corners, especially at odd angles,
requires a lot of manual editing.
This edge stitch creates a faux merrowing look
programmatically. You can use it on virtually any patch shape. Where corners
break sharply, the edge stitch will do what a machine operator would do: It
lifts and resets the overlock. Thus, you will see corners and shapes that very
much look merrowed, but a merrow machine would be unlikely to accomplish.
Note: If you have a lot of patches to produce, invest in a
Merrow machine or similar. They’re fast and efficient. If you’re doing small
batches and prefer to do it all in the embroidery, this stitch is for
you.
The patch objects normally precede the design; you embroider
on the patch. The patch objects consist of a position run, a material run or
fill, and a topstitch that is the merrowed finish. The position run is used to
place a patch on fabric, a project or wherever you need to see it go in your
embroidery hoop. Then you have some choices:
1.)
Patches can be formed on fabric (usually fused twill) and cut after the entire
patch is complete. This involves cutting close to the outside edge of the patch,
then using a heat source (hot knife, wood burner, soldering iron, lighter) to
seal and finish the edge.
2.)
Patches can be precut and laid on a stabilizer in the hoop. This can be a mesh,
fusible, sticky or even wash-away. There are some companies that make pre-cut
patches, or you may choose to use a fabric cutter to cut a custom shape.
3.)
Patches can be created with no cloth using a fill that has enough layers to make
it freestanding. This uses a lot of thread and takes a lot of time, so it is
impractical for production of a large quantity of patches.
4.)
Patches can be sewn on a fabric or precut patch back, then the color and texture
may be enhanced to suit using a light fill across the surface. This fill
typically has about half the density of a normal fill and simply aids the
surface color and texture. It is a technique commonly seen in military
patches.
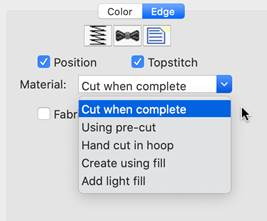
The properties of the Edge stitch.
The control of the type of patch is done using the material
drop-list. There are also checkboxes to control the inclusion of the position
run, which may not be needed, and topstitch (overlocking) which may be sequenced
into a separate object.
The Fabric Preview option, used when there is no material
fill, is for visualization of color, and functions identical to the same option
in applique objects.
Patch objects usually run before the full design. This allows
proper registration of the border to the position and material levels.
Occasionally there is the need to have the design run after the position, but
before the topstitch. In this case, duplicate the object, and place the copy of
the object after your design sewing. On the later copy, select ‘Cut when
complete’ and deselect the Position. On the earlier object, deselect the
Topstitch option. If the patch has no applique steps, it can run after the
design.
Patches can be made using other films, tear-away or wash-away,
as hooped stabilizer, and the applique method of laying the patch into a
position stitch can be used. This improves edge removal, but requires the
backing removal. If you use this method, split the patch into two objects,
sewing the topstitch after the design, as the needle penetrations will weaken
the stabilizer and perforation can occur which can affect the registration of
the design. Moving the topstitch to sew after the design, the stabilizer has a
better chance of doing its job.
Entry of a patch object defines where the
position or material run will begin. The exit point simply travels from the
final stroke of edging to that exit. It may or not be useful to locate that
exit, but it is an option. Please realize that in order to do what it does, the
program must select certain things to happen in sequence.
Finishing the patches can be done by hand trimming any excess
threads. If you’re using wash-away stabilizer, and the design has hard corners,
try adding a drop of anti-fray to the corner before washing the stabilizer out.
Alternately, finishing with heat will seal off anything you’ve cut.
When using a
poly mesh or twill, always fuse it. Either heat-fusible material or a really
good adhesive stabilizer will help. When finishing, cut with a hot knife or
curved embroidery scissors. Then, use a heat source and take care to seal the
edge, but not melt the patch itself. It’s easy to get too much heat applied. Use
a tool where you can control the temperature, if you can, otherwise, use a
steady hand and don’t get too close for too long. Woodburning, soldering or hot
knife tools are good. A lighter is a tool, but not as easy to control.
The standard edge width for a patch is 4.2mm or about
3/16th of an inch. When sizing the patch around your design, leave
some whitespace, about the same as the edge width, in order for the design to
look balanced. If you’re using the inflate tool, about 8mm is reasonable.
The patch edge forms at the outline, with a minimum cast over
the outline. This enables you to use predefined shapes, such as the ubiquitous
.svg files that appear on the web these days. Keep this in mind as you plan your
outline – the edge of the stitch is the edge of the patch, and you need 3.6mm of
interior space for the overlock.

For more tips on patchmaking, please visit our
website.