•Use Automatic Settings: makes use of the Project Advisor project to identify the fabric density, thickness, stretch and material being used. The needle penetrations are then adjusted accordingly.
•Limit Density: Certain combinations of fabric and stabilizer have limits on the number of stitches per square millimeter. More than that causes poor stitching or puckered fabric. Using the Project Advisor, the limiter will reduce the stitch counts in the affected regions.
•Remove Underlap (intra-design): Often a design has color layers that have some overlap for the purposes of registration. However, many times these regions are a result of auto-digitizing and poor results follow. The so-called, “Bulletproof Embroidery,” is an example. When stitching enters an area within a design that will be covered by a later color, those stitches can often be removed, and that is what this does.
•De-Clump: Within sewing a single color, areas sometimes get too many stitches overlapping in small groups. These areas form clumps of thread on the back of the fabric which can become entrapped in the needle plate. Sometimes this traps the embroidery in one place and cause loss of registration. De-Clump reduces these stitches.
Some designs are simply digitized too dense for certain projects. Other designs work well except for particular areas in the design that are too dense. When you select a fabric density and thread weight in the control group “Automatic Density Adjustments,” the Density Limiter creates a minimum-allowable density for your project. The Density Limiter will analyze each section of your design, looking for stitches that are too close together. It will then selectively adjust the density of those areas that need it. Only areas that are too dense for the project and/ or thread are affected. This filter is very helpful when you increase the thread weight. Fabric stabilization needs to be radically increased with heavy thread. By reducing the number of stitches, heavy threads can be better supported with less stabilization. Also, this filter will help preserve a clean look to your designs when working on loose fabric. Because the fibers in the fabric are farther apart, stitches will tend to clump in one needle-hole, rather than fanning out evenly. This gives a ‘pinched’ look to the edges of the embroidery. If your design is too dense for some fabrics, your needle can actually cut the fabric, leaving you with a hole and a patch instead of embroidery.
Now you can combine designs and have them overlap! In the past you could not do this because the area where they overlap would have too many stitches. This tool can automatically find those overlapped areas and cut out the stitching underneath so that the design can sew flat!
Here’s a great example for the use of this tool:
Suppose that you want to create a drop-shadow for text. Duplicate your text, and change the color. Then position the top color slightly up and to the left. Remove Hidden Stitches to flatten the result so that it will look nice and sew easily.
What about areas that were digitized without ‘hole-sewing’ mode turned on?
Say an area of color has another color sewn in the middle of it. Remove Hidden Stitches will ‘flatten’ the area under the second color by converting the hidden area to a satin fill. This makes it less difficult for the needle to penetrate the fabric as the top color is sewn.
In some designs more than one color is used to create padding stitches for the entire design. In this case you will want to turn the “Keep Padding Stitches” feature on in the Preferences Window. These stitches are technically hidden and will be removed otherwise.
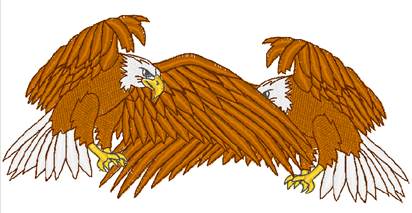
Maybe you want to do this. But the first eagle’s wing is a
problem:
The under wing needs to be removed. Select Remove Hidden Stitches to remove the under wing of the eagle:
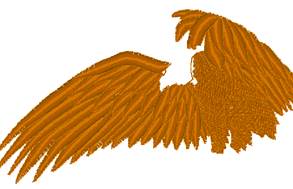
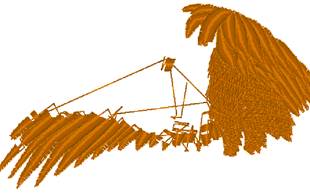
Your design is ready to sew. (And it will!)
Note: This is different from removing hidden stitches created by overlapping separate designs, such as in a composition. This filter works within a single design.
This is a variation on the Remove Hidden Stitches filter. De-Clump will analyze a color and remove stitches that are hidden within that single color.
When a color sews repeatedly over itself, it can create a thread build-up that prevents the design from sewing nicely. Too much thread will distort a design, causing the fabric to ripple around the edge of the design. De-Clump helps to thin the design by reducing the number of thread layers.
We’re certain that you’ve watched a design sew in-place a dangerously long time. If you’re like us, you hate watching it because you just know it’s going to jam up. De- Clumping takes the worry out.
Another benefit from De-Clumping is that you can get rid of excessive padding stitches from poorly digitized designs, as well as those annoying sections where a design sews over itself. HINT: A topping, such as a water-soluble stabilizer, provides most of the support your design needs. This can help in situations where the padding was poorly implemented. NOTE: Designs that have padding stitches removed by the De-Clump filter will sew out differently. You will encounter more jump stitches nested in the design.
It is okay to cut away the jump stitches while sewing. If you prefer, however, you do not have to since all these stitches will be sewn over later.
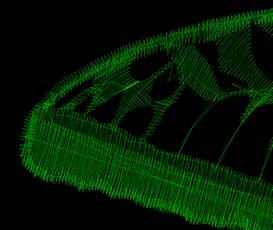
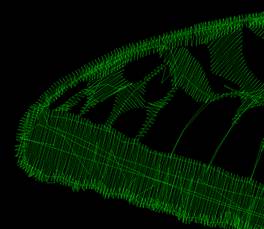
Left: Before De-Clump filter. Right: After De-Clumping.
 The
Sweep function, which is run from the button with the vacuum on it, will remove
hidden and nested stitches within designs, as well as removing hidden stitches
where designs are overlapped.
The
Sweep function, which is run from the button with the vacuum on it, will remove
hidden and nested stitches within designs, as well as removing hidden stitches
where designs are overlapped.
These patented filters operate on the colors of a design to help reduce the stitch count, removing excessive overlays and stitches that tend to ‘ball up’ on the underside of the fabric.
Removing hidden stitches occurs as the program examines the design, looking for color layers that overlap more than is necessary for compensation. If stitches of one-color layer are on top of the stitches for another color, and those stitches are not visible, they can usually be removed. Stitches that would be overlapped at the edges of the colors are important for the design so as not to have gaps, thus they are not removed. What you get is a reduction is stitch counts, a reduction in sewing time and a reduction in puckering.
Note that the Sweep is different from the process that removes stitches from overlapping designs. The Sweep operates within a single design, whereas overlapped designs are ones that are merged in separately and then laid on top of each other. The processes are similar, but different in that way. Another difference is that the Sweep filters are not temporary; they are re-run on the designs as they are adjusted (for instance by sizing.)
De-Clumping is a process where stitches within a single color are eliminated if they will gather up in small areas. These clumps of stitches can often prevent the hoop from moving freely by forming a ball under the fabric, which can anchor the needle in one area. When and if the hoop finally pulls away, the user often hears a ‘clunk’ sound and their project will probably have a gap, as registration may have been lost.
Occasionally one of the sweep filters will leave an undesirable result, which is visually evident. As a rule, these filters do a great job, and if the design looks good on the screen, it will sew nicely. However, if you see something onscreen that you don’t like, you can prevent the Sweep from running on individual colors using the Stitch Properties tab.
Note: You can also prevent Sweep operations for occurring on certain objects or designs when you want to.

When you have chosen a project in the Project Advisor, the program lets you set that project on the design page so that the Stitch Perfect filters can use it.
If you would like to clear your project, click on ‘No Project.’
The Project system stores information such as Fabric, density, stretch and stabilizer to help the filters for stitch files minimize the pucker and gather that occurs when designs are used on lighter fabrics than for which they were digitized.
Remember that it’s just a program running on a computer, and that’s the same type of system your bank uses to lose your credit card payment. Computers don’t know anything about you or what you are doing. They are only taught to handle basic general parameters. We’ve tried to make the automated tools work well for most designs, but please look at the result before sewing. This will save you a lot of time.
Here’s a for-instance: Cross-stitch designs sew over themselves a lot. De-Clump sees this as a no-no and tries to lighten the load. This will result in extra jump stitches, and you’ll be mad at us. We haven’t figured out how to teach the computer to know that you are doing cross- stitch yet, so you’ll have to keep that in mind. A little common sense (yes that can be an uncommon thing) will help a lot. Overall, though, we think you’ll be amazed and happy and dance.