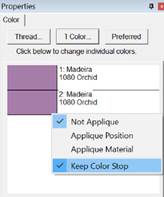
Normally, when two colors that are the same follow each other, the stop in-between those colors can be removed: It lets the machine continue sewing without bothering the operator.
Certain designs, such as appliques in particular, will require that the machine stop so the operator can do something, such as lay down an applique. For this purpose, there is a setting on every color called ‘Keep Color Stop’ which is accessible by right-clicking the color chip in the Color Properties.
When sorting, the program is aware of applique colors and will sort them together, but will add a ‘Keep Color Stop’ flag on the color if it seems to overlap or touch the previous applique step.
Color sorting can be useful in designs like this or designs that have poor sequencing. Color sorting in this program is intelligent, meaning it doesn’t indiscriminately combine all like colors together. It looks for layering and knows that some colors simply must be repeated.
Note: Do use caution when color sorting. Some designers have intentionally added extra color changes either for design flexibility or to optimize registration. For this reason, always save the Color Sort with a different name (or save the .BE file) just in case you want to go back to the original!
 Design elements can be scaled up to the design page by selecting them and
clicking the Fit Hoop tool. This will recalculate stitches wherever possible.
There are limits, though, such as with regular embroidery designs, which can
only be sized up to 250%. This button will scale your design as large as it can
go, up to the built-in limits.
Design elements can be scaled up to the design page by selecting them and
clicking the Fit Hoop tool. This will recalculate stitches wherever possible.
There are limits, though, such as with regular embroidery designs, which can
only be sized up to 250%. This button will scale your design as large as it can
go, up to the built-in limits.
 When designs are overlapped, there
may be stitches that are hidden, which you would like to have removed. This
process is automatically done when you save a file (controllable by preferences)
but you may want to preview the results before saving. The Remove Hidden
Stitches will run the process on those stitches so that you can evaluate the
result. The result is temporary, however, so if you change anything on the
design page, the stitches will return. This happens because changing a design
will almost always regenerate its stitches.
When designs are overlapped, there
may be stitches that are hidden, which you would like to have removed. This
process is automatically done when you save a file (controllable by preferences)
but you may want to preview the results before saving. The Remove Hidden
Stitches will run the process on those stitches so that you can evaluate the
result. The result is temporary, however, so if you change anything on the
design page, the stitches will return. This happens because changing a design
will almost always regenerate its stitches.
For applique designs, use the applique tab on the color properties to tell the program that certain colors are applique steps. The position and material steps will not have their stitches removed, as it is considered likely that you will need those stitches. However, the applique material would naturally cover over other stitches, and the material fill is used in the removal of earlier stitching. This is controlled by the Preference “When Saving.”
 The
Project Advisor is a patented expert system, a form of artificial intelligence,
which helps you select stabilizer, needles and hooping techniques for many
common projects.
The
Project Advisor is a patented expert system, a form of artificial intelligence,
which helps you select stabilizer, needles and hooping techniques for many
common projects.
The system also provides instructions, helpful how-to advice and some words of caution when necessary. First, you select a project from the list. If your exact project or fabric is not listed, there are enough choices available where you can choose something very similar. Next, you can tell the Advisor if your fabric has more or less stretch, and you can adjust thickness. The Advisor takes your input in account as it makes its recommendations that are displayed as text in the window.
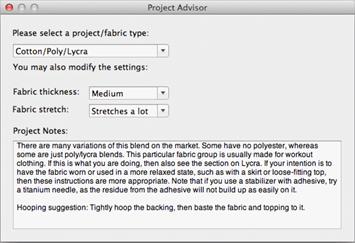
Both the backing (under the fabric) and topping (on top of the fabric) stabilizers are recommended.
 If
you have a Husqvarna Viking Designer machine that uses either a USB stitch or a
3.5” diskette, you can create the proper files and file structure via Utility
-> Designer 1 Disk Utility.
If
you have a Husqvarna Viking Designer machine that uses either a USB stitch or a
3.5” diskette, you can create the proper files and file structure via Utility
-> Designer 1 Disk Utility.
When the Designer 1 Disk Utility window opens, you choose whether you want to write to a diskette or a stick. Next, choose the menu you on which you want to store the designs. Designs are imported to only one menu at a time.
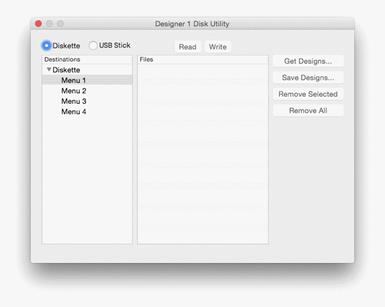
Note: If you want to add files to a previously created Designer diskette or stick, you will need to first read in the designs and then add the new files to one of the menus. When a Designer disk or stick is written, it replaces any matching file and folder names.
Click the ‘Get Designs…’ button and navigate to the desired designs. You’ll see the now familiar ‘Get Designs’ window where you select individual designs or the entire folder to import.
Note: Each menu can store up to 36 designs. If you select more than that to import, only the first 36 will be imported.

The designs are imported with their original file names and file types at this point. To finish the process, click the ‘Write’ button. Navigate to the desired destination and click ‘Select Diskette.’
Similarly, Designer diskettes and sticks can be read into Embrilliance by clicking the ‘Read’ button.

When you view the newly created Designer 1 media, you’ll see the files are renamed appropriately and all the necessary support structure is also created.
Tip: You are not required to write to an actual diskette. If you create folders ahead of time, you can actually “write the diskette” into a folder on your hard drive for copying onto a diskette later.
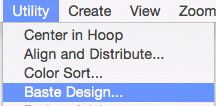
Individually selected designs can have a basting stitch added automatically. This is useful when you want to add a layer of stabilizer or some other material before the sewing of a design. The baste is always placed intelligently so that it runs immediately before the selected element(s), as shown in the screen shots below.

All elements were selected (Ctrl-A) before applying baste.

Various elements selected individually and together before
applying baste.
Notice where the baste stitches are placed in the Objects
View.

Here an initial baste is applied and then various areas.
Basting stitches can also be used to secure a layer of topping stabilizer in place before any designs are sewn. A typical use of this is to add a layer of water-soluble topping to a towel, which keeps the stitches from becoming embedded in the terry cloth loops during sewing. It can be hard to hoop a towel, and the topping stabilizer will want to slide around before the stitching happens, so basting it first can make the process easier.
The basting stitches are added to the start of the design or file, and are added as a separate color; naturally you can use any color you want to sew the basting stitches.