Various features of Enthusiast are found as additions to the Utility menu.
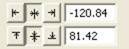
You can precisely position designs using these buttons. The three buttons on the (top, left) control the display of the x-axis position. There are Left, Center and Right, which means that when you have the Left button set, the display will be of the left edge of the design.
Similarly, the bottom three buttons control the vertical axis, top, center and bottom respectively. The position controls are very useful for creating tiled patterns.
Your best friends will be the top ruler and left ruler along the edge of the Design Page. You will notice that center of the ruler is “0”. To the left of “0” is -. To the right of “0” is plus. Let’s place a design on the design page and get started with Precise Position!
Decide what size embroidery hoop you are going to use and open it onto the Design Page. You will notice that there are four quadrants inside the hoop.
Open a design onto the design page.
Place the design in the top left quadrant. Note the numbers in the x and y location boxes. (-47.17 and 50.25)

Select the design and right click to copy and then right click to Paste the design.
Click on Flip Horizontally.
Delete the minus (“-“) from 47.53 and hit enter. This will move the copied design to the right top corner.
Select the design and right click to copy and then right click to Paste the design.
Click on Flip Vertically.
Place a minus (“-“) next to 50.14 in the y location box. (-50.14)
Hit enter. The design moves to the bottom right corner.

Copy and paste the design in bottom right corner.
Click on Flip Horizontally.
Place a minus (“-“) next to 47.53 (-47. 53) in the x location box. Hit Enter.
Your frame is now complete!
This is a great way to align your designs without the frustration of where you placed the first design and how to get the others to follow suit.
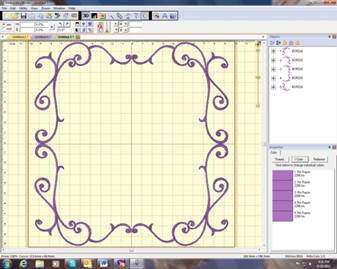
From the Utility menu, select “Instant Repeat.” This opens window that lets you create a pattern of designs, copied from the current selection, and pasted in rows and columns.
To change the values, click the arrows next to each value, or type in a value and then click on another one to set it.
As you change the values, you will see your result on the main view.
Click OK to accept your new designs.
Above: An example of a repeated design.
Notice how the preview enables you to see the pattern as you adjust it, which helps if you’re trying to fit an area, for example the hoop.
Note: The initial design will be the (top, left) design, and the copies will go to the right and down.
From the Utility menu, select “Mirror X4.” This will call up a window that lets you create a pattern of designs, copied from the current selection, and pasted in mirrored corners.
To change the values, click the arrows next to each value, or type in a value and then click on another one to set it.
As you change the values, you will see your result on the main view.
Click OK to accept your new designs.

Above: An example of a Mirror X4 design.
Notice how the preview enables you to see the pattern as you adjust it, which helps if you’re trying to fit an area, for example the hoop.
Note: The initial design will be the (top, left) design, and the copies will go to the right and down.
From the Utility menu, select “Carousel.” This will call up a window that lets you create a pattern of designs, copied from the current selection, and pasted in an elliptical fashion
To change the values, click the arrows next to each value, or type in a value and then click on another one to set it.
As you change the values, you will see your result on the main view.
Click OK to accept your new designs.

Above: An example of a Carousel design.
Notice how the preview enables you to see the pattern as you adjust it, which helps if you’re trying to fit an area, for example the hoop.
Note: The initial design will be the (top, left) design, and the copies will go to the right and around.
From the Utility menu, select “Scatter.” This will call up a window that lets you create a pattern of designs, copied from the current selection, and pasted in random locations based on your dialog box selections.
To change the values, click the arrows next to each value, or type in a value and then click on another one to set it.
As you change the values, you will see your result on the main view. Click on New Pattern to generate a new random pattern based on the selected values
Click ‘OK’ to accept your new designs.

Above: An example of a Scatter design.
Notice how the preview enables you to see the pattern as you adjust it, which helps if you’re trying to fit an area, for example the hoop.
Note: This is a way to get a random repeat of similar designs.
 When sewing on terry or any fabric with loops and nap, generally a topping
stabilizer is used. These can be helpful, but have a limitation: They do not
hold down the nap past the actual stitch, which means outlines can be lost in
the surrounding fabric. Using the menu Utility->Add Knockdown Stitches you
can create a global underlay for the entire design. The underlay extends a few
millimeters past the edge of the design, which helps the overall effect.
When sewing on terry or any fabric with loops and nap, generally a topping
stabilizer is used. These can be helpful, but have a limitation: They do not
hold down the nap past the actual stitch, which means outlines can be lost in
the surrounding fabric. Using the menu Utility->Add Knockdown Stitches you
can create a global underlay for the entire design. The underlay extends a few
millimeters past the edge of the design, which helps the overall effect.


When you add Knockdown stitching, there are some options you can use. Generally, don’t change the defaults.
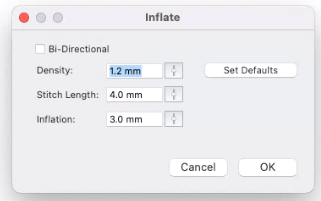
These options are included for fabrics that react in unanticipated ways, and the only way to know what to adjust is through the process of test-sewing.
Knockdown normally stitches one direction, on a bias, but some users have asked for it to stitch both ways for additional flattening. This is what the Bi-Directional box is for. Alternately, the density can be increased to hold down in a tighter pattern.
Stitch length is adjustable if it helps with the nap. It is fairly universal at 4mm but some digitizers like to have control of it for other purposes.
Inflation controls the size of the knockdown. For its intended purpose, the Knockdown has to be larger than the design, but normally not a lot. Some may want to extend the size by increasing the inflation, which makes the embossed look of it stand out further.
With Essentials, individually selected designs can have a basting stitch added automatically. This is useful when you want to add a layer of stabilizer or some other material before the sewing of a design.
But with Enthusiast, a basting stitch can be added to the hoop, which allows for a layer of topping stabilizer to be basted in place before any designs are sewn. A typical use of this is to add a layer of water-soluble topping to a towel, which will prevent the terry cloth loops from coming up through the embroidery. It can be hard to hoop a towel, and the topping stabilizer will want to slide around before the stitching happens, so basting it first can make the process easier.
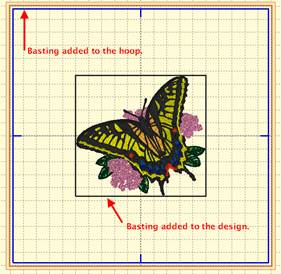
The basting stitches are added to the start of the design or file, and are added as a separate color; naturally you can use any color you want to sew the baste.