 Color is
surprisingly influential. We may be initially attracted to or repelled by an
item or design simply because of its color. The ability to view designs in
realistic thread colors is an asset to the embroiderer.
Color is
surprisingly influential. We may be initially attracted to or repelled by an
item or design simply because of its color. The ability to view designs in
realistic thread colors is an asset to the embroiderer. Color is
surprisingly influential. We may be initially attracted to or repelled by an
item or design simply because of its color. The ability to view designs in
realistic thread colors is an asset to the embroiderer.
You may want to recolor a design to better suit your tastes, to coordinate with the threads you have in your stash, or to color a design that you’ve converted from a format that doesn’t hold color settings, such as .DST.
When you merge a Library design, create a lettering design, or merge a stitch file, the objects come in with the colors and the thread brand that the designer has assigned—even if you have another brand specified as preferred (more on that in a bit).
If the merged stitch file is a .DST file or other format that does not hold set colors, then threads cannot be matched to any thread brand and will simply be a list of generically named colors.
Tip: If you’d like to get an idea of how your design looks on a particular color, you can change the background of your main window in Environment -> Grid Settings in the Program Preferences.
Changing colors is done via the Color tab on the Property Sheet, which is the lower panel on the right-hand side of your screen. The color tab displays the thread sequence of the design. Selecting a color swatch on the tab doesn’t select anything in the design; it simply allows you to select and apply a different color from any of the thread brands loaded into the program.
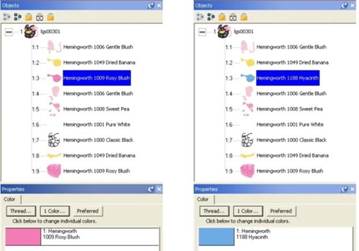
When first getting acquainted with Embrilliance, it may be confusing to see what looks like two color lists. The top list shows a tree-like structure of all the various objects in the current main window. This includes Library designs, letters, and any merged files. In the sample shown below, a single design has been merged and the design has been opened in the objects panel so that all the various objects can be viewed.
Because this is a stitch file, each object is all the stitches that are contained within a given color. In this instance, when you compare the object list next to the color list, you’ll see that they match. For example, object 1:6 corresponds to color number six in the following samples.

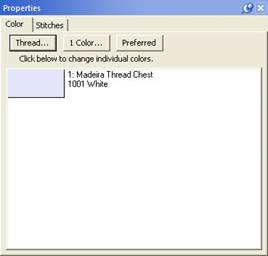
The color tab shows the colors of the currently selected object(s). If nothing is selected, the list shows all the colors on the current design page. Select areas of your design by clicking them in the object list. Select more than one area by holding down the Ctrl Key.

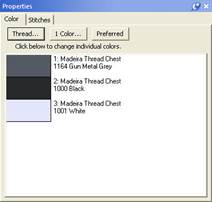
The colors list only shows the colors of the selected items.
There are three buttons across the top of the Color properties tab:
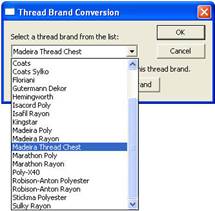
• Thread… Select a thread library to use and set a preferred thread brand
• 1 Color… Make the design monochromatic (one color)
• Preferred Change the colors to the closest match in your preferred thread brand
To change a thread color, simply click on the color swatch that you wish to change on the Color tab. The Thread palette will open with the color selected in the original thread brand specified by the designer. You can select a different thread line from the drop-down menu and the program will find the closest match in that chosen thread line.
Embrilliance includes a wide range of popular thread brands and lines.
Note: In the case of a DST, TAP or EXP file, the Color tab displays a list of generic color names. This is because these formats have no color information in them. Using Embrilliance you can color these designs, and when you save the working file, the colors will be saved therein.
Similarly, PCS, PCM and HUS formats have limited color palettes. Again, saving the working file will preserve your colorization, and you can print colorized design templates and color information. This is especially handy for commercial embroiderers.
Clicking one of these color swatches will open the thread brand that you have set as preferred (Madeira Thread Chest is the default). To change the color, navigate to the desired color and click OK.
.DST file shown with generic colors and the thread palette displayed.
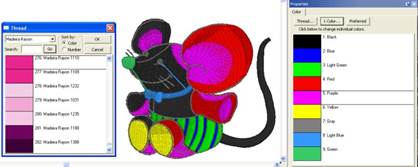
Some thread lines only have thread numbers, while others have numbers and color names. You can search either line by thread number but you can only search by name if the threads have color names. Type in the color or thread number in the search box and click ‘Go.’ Or, you can simply scroll through the list and pick one that appeals to you. Once the color is selected, click OK to apply it and close the Thread palette.
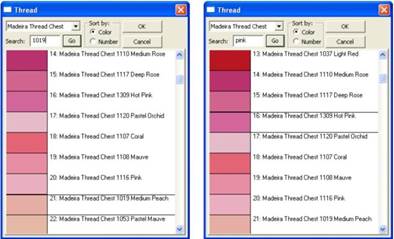
Threads can be searched by number or name.
The ‘Thread…’ button allows you to change thread brands or to set a preferred brand by choosing a thread brand from the drop-down list. Once a preferred brand is selected, you can easily change all of the colors in any design to your preferred brand by clicking, “Use this as my preferred brand.”
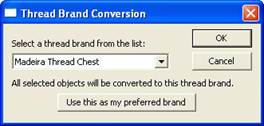
A thread brand can be selected on a per-design basis or can be made preferred.
Note: Be advised that while this may be convenient for you, if your design has carefully chosen and blended colors, converting brands may cause a less than desirable result—especially if a “close match” does not exist in the new brand.
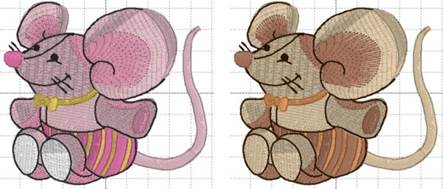
Left: Original Hemingworth colors. Right: Shown using Brother Flesh Tones.
The color list does not name the areas that are colored. For example, suppose you want to change the pink shorts on the mouse design to blue. An easy way to do this is to find the area in the Object panel and select it. The color is now isolated in the Color panel and you can easily click it and select a blue.
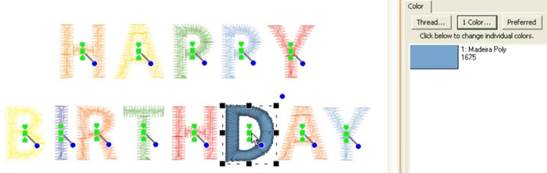
Coloring Letters works a bit differently. To color individual letters, click on the center of the letter to select it. Then, as before, click the color swatch to select a new thread color.
There a couple ways to select by color.
1.) The edit menu has Select by Color which will use the colors of any selected objects and select all other objects that are colored with those colors.
2.) Right-click the color chip and chose Select Object. This is useful when there are a large number of objects on the page and you want to easily find and select one or a few based on color.
When you have many objects on the page, you may want to change a color that’s in use by many objects. Right-click on the color and choose Change Color on Page.
When there are successive objects that have the same color, normally the embroidery machine will not stop. Where is it useful, for instance when doing applique on a multi-needle machine, you may want to instruct the machine to stop, but not switch colors. Right-click the color chip and select Keep Stop.
Colors can be assigned to applique steps. This setting instructs the program how to interact with the stitches in processes such as color sort or when removing hidden stitches. Applique positions will not have their stitches removed. Applique material steps indicate that there’s fabric that has been laid down, which will cover other things, not just where the stitching exists. Also, stopping the machine during applique is necessary, so if you color sort the file, the applique setting helps the color sort system add flags to keep the stops.
Most thread for embroidery has a typical “Weight” of “40”. What’s this? Well, it comes from the old Japanese manufacturer Gunze’s numbered naming system for their thread (ex: #40), and the USA adopted an incorrect version of it, probably due to translation error, calling all threads by weight (ex: 40 wt.). Outside the US, the numbers are commonly sold using different systems.
Imagine if you will, being a thread maker. You need to buy the stuff to make your thread: cotton, silk, etc. You buy that stuff by weight, so it makes sense to sell your thread by weight too. And the idea that you have 1 gram of silk making up 100 meters of thread, gives your customers an insight into how thin, and how valuable, your thread is. Hence silk thread is often sold as 100wt.
Man-made material is measured similarly, but using the term Denier, which is the weight of 9,000 meters of thread. If 9,000 meters weighs 120 grams, that’s 120 Denier thread.
It would make sense if there was a common numbering system, and there is, called Tex (1,000m/g), but it isn’t as popular in use.
In embroidery, the traditional thread is rayon, and the 40-weight common thread is made by taking 2 thinner threads of 120 denier thickness, and winding them together. That makes the thread thick enough to embroider with a 75/11 needle and a .4mm density. When the makers of polyester began making embroidery thread, they approximated the rayon by using three pieces of 50 wt. thread wound together. Often, you’ll see this as 50/3 on a spool. (Realize that 50/3 is 50% more than 50/2!)
But none of the systems actually address thread thickness directly. We can’t tell you why, other than that the thread makers aren’t thread users, and the thread users use their fingers to feel it.
You will notice that on some threads the thread weight is part of the name. This is important, as the program assumes a normal thickness (A.K.A. #40) but will read the “wt.” off thread names and adjust things such as short-stitching in native objects. More on that can be found in the section on the Thread Utility.