 Applique Objects have “Position”, “Material” and top stitching steps.
The use of the steps is optional, including the top stitch. Here is a general
way that applique is typically machine embroidered:
Applique Objects have “Position”, “Material” and top stitching steps.
The use of the steps is optional, including the top stitch. Here is a general
way that applique is typically machine embroidered:Applique Objects have “Position”, “Material” and top stitching steps.
The use of the steps is optional, including the top stitch. Here is a general
way that applique is typically machine embroidered:
The “Position” step places a run down on the fabric, and then stops the machine. This is used to provide you with a placement line for your applique. You can use a Pre-Cut applique, perhaps cut with a machine, or by hand using a template. Or you can simply lay down a piece of fabric big enough to cover the placement stitch. A tip to placing your applique is to use some adhesive, spray-on, ireon-on or otherwise, to hold the applique fabric in place when the machine is restarted.
The “Material” step will sew another set of running stitches to anchor the applique fabric in place. This step may be omitted if the applique is Pre-Cut, as the topstitching will anchor the fabric down.
The topstitch finishes the edge of the applique, and you can choose from Blanket Stitch, E-Stitch or Satin Border.
Note: You can also use the Satin Border object type to make appliques, and it provides additional properties.
The applique properties add applique steps and visualization to the object. You can select adding a “Position Stitch” which will be a single run that sews out to indicate to the user where the applique will be laid. Then an optional “Material” run can be done to anchor the applique in position.
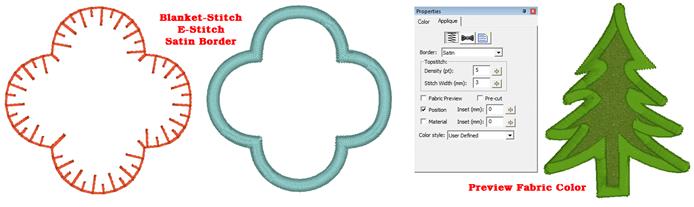
Blanket and E-Stitch have stitch length and width that can be set in the properties. The Satin and Zigzag stitches use density and width. The applique can have a fabric preview that lets the user visualize the final applique with colors similar to those that will actually be used. The color used for the preview is set by the color of the Position step.
The Pre-Cut checkbox indicates that you will have the applique already cut, and this causes the object size to be locked, preventing you from inadvertently mismatching the design and the fabric. Pre-Cut appliques could also come from dies, where the exact size of the applique is known in advance.
If you scan in a precut shape to create an applique, such as from a die-cut fabric, place the fabric on a background grid with known measurements – for instance 10mm or ½”. Using those measurements, you can scale the image to match the grid in the program, so that the size will be exact. Sometimes, a scan may have a vertical or horizontal difference in scale (it can stretch the image) but the grid you scan in will show you that, if you use the measuring tool on the main toolbar.
Applique insets are used to offset the stitching from the applique material itself. If the material or top stitch was identical in size to the applique (if it is pre-cut especially) then the applique might not be well sewn down and could lift away from the finished product.
The Color style allows users to adjust how they work with color during appliqué steps. There are three styles: Keep Color, PES Card (Traditional) and User Defined.
Use Keep Color to conserve thread changes by combining like colored Top Stitch and next position placement stitches. This will allow the machine to stitch the finishing stitch of the piece and the placement stitch of the next piece (if the same color) without having to start the machine again.
For traditional stops after each section, you may select the PES Card option from the Color type list. This selection may be necessary depending on your machine, particularly if you use PE-Design / Palette or similar to write a PES card for your machine.
The User Defined lets you use any color you want.
In the Color Properties you can click on a color to change it, and this displays the Thread window, which also has an “Applique” tab. Using that tab, you can save a cutting file for virtually any cutter.
StitchArtist also enables you to mix an image into your applique, making mixed-media applique a unique option for your projects.
Please refer to the Applique section in the Embrilliance Platform.