 Color
is surprisingly influential. We may be initially attracted to or repelled by an
item or design simply because of its color. The ability to view designs in
realistic thread colors is an asset to the embroiderer.
Color
is surprisingly influential. We may be initially attracted to or repelled by an
item or design simply because of its color. The ability to view designs in
realistic thread colors is an asset to the embroiderer. Color
is surprisingly influential. We may be initially attracted to or repelled by an
item or design simply because of its color. The ability to view designs in
realistic thread colors is an asset to the embroiderer.
You may want to recolor a design to better suit your tastes, to coordinate with the threads you have in your stash, or to color a design that you’ve converted from a format that doesn’t hold color settings, such as .DST.
When you merge a Library design, create a lettering design, or merge a stitch file, the objects come in with the colors and the thread brand that the designer has assigned—even if you have another brand specified as preferred (more on that in a bit).
If the merged stitch file is a .DST file or other format that does not hold set colors, then threads cannot be matched to any thread brand and will simply be a list of generically named colors.
Tip: If you’d like to get an idea of how your design looks on a particular color, you can change the background of your main window in Environment -> Grid Settings in the Program Preferences.
Changing colors is done via the Color tab on the Property Sheet, which is the lower panel on the right hand side of your screen. The color tab displays the thread sequence of the design. Selecting a color swatch on the tab doesn’t select anything in the design; it simply allows you to select and apply a different color from any of the thread brands loaded into the program.
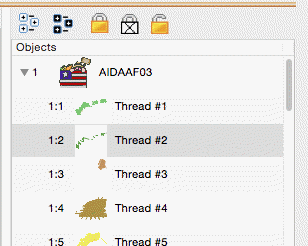
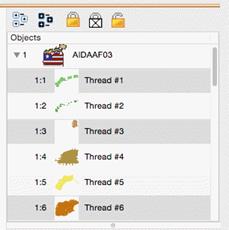
When first getting acquainted with Embrilliance, it may be confusing to see what looks like two color lists. The top list shows a tree-like structure of all the various objects in the current main window. This includes Library designs, letters, and any merged files. In the sample shown below, a single design has been merged and the design has been opened in the objects panel so that all the various objects can be viewed.
Because this is a stitch file, each object is all the stitches that are contained within a given color. In this instance, when you compare the object list next to the color list, you’ll see that they match. For example, object 1:6 corresponds to color number six in the following samples.
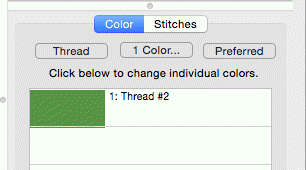
The color tab shows the colors of the currently selected object(s). If nothing is selected, the list shows all the colors on the current design page. Select areas of your design by clicking them in the object list. Select more than one area by holding down the Ctrl Key.
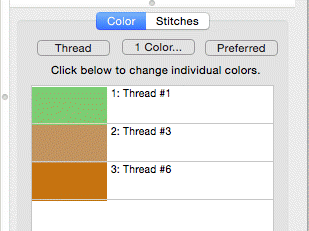
The colors list only shows the colors of the selected items.