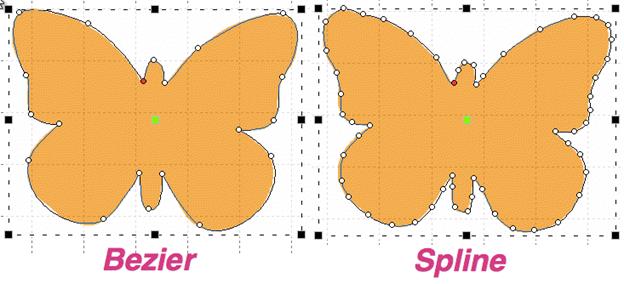
We have made the editing of outlines work in two modes, Bezier and Spline. To understand spline, imagine something flexible, but with a little bit of spring to it – in the original context a spline was a light piece of wood that could be shaped around things. In this use, it is a line that flexes around ‘Nodes’ on the screen (where you have clicked). The more clicks you give, the tighter the spline will have to bend in order to conform to the shape you want.
Bezier lets you adjust the curves using handles, as we have discussed. Now you get to decide how you will perform your edits.
 The
Spline/Bezier button on the Tool Pane will toggle all the selected objects to
either show their handles, or hide them. Remember, if you switch handles off,
the outline will change to its automatic shape, and you may have to add some
nodes in order to recover the curves. Spline mode will almost always require
more nodes than Bezier.
The
Spline/Bezier button on the Tool Pane will toggle all the selected objects to
either show their handles, or hide them. Remember, if you switch handles off,
the outline will change to its automatic shape, and you may have to add some
nodes in order to recover the curves. Spline mode will almost always require
more nodes than Bezier.
If no objects are selected, this button also sets how your next objects will be treated, once drawn. This button also acts as a program preference, so if you choose to always work with Bezier, the next time you run the program this will determine the state in which you start.
You can select a node by clicking on it. You can use the Ctrl key while clicking to select multiple nodes. If a selected node is clicked with the Ctrl key it will be de-selected, as is typical with virtually all computer systems.
You can also select nodes by dragging around them. First, select the object that you would like to edit. Then drag around the nodes you want. When you release your mouse button, the nodes inside the area you dragged will be selected.
You can also operate on holes, carving lines and breaklines in this manner – drag around the nodes you wish to adjust.
Double click on the outline to insert a node. Double click on a node to remove it. If you have a node or nodes selected, you can also use the ‘Delete’ key to remove them.
You can switch the type of any selected nodes by right-clicking, which will bring up a pop-up menu. The node types are Curve, Line and Cusp, as we have discussed. Remember that a curve will allow stitches to pass through it without forcing the needle to stop at the node, but by necessity of the shape, lines and cusps will cause the needle to land on those nodes.
Sometimes an inclination line will be made very near a node. If that node is moved so that the inclination line is left in empty space, the incline will be removed automatically. We suggest you adjust your outlines first, then go back and add and adjust your inclination lines.
Spline mode has the ability to insert and remove nodes to adjust the shape. If the curve is too far away from the outline you want, simply add more points on the outline where the shape you have is ‘most different’ or furthest away from the artwork.
It is often best to begin with minimal nodes in the outline, only basically representing the shape you are drawing. Then, go back and insert only the nodes that are needed to pull the outline into shape. Doing it this way, you will use a minimum of nodes.
Why use a minimum of nodes? The stitches being generated have to look at all the nodes on your shape. If you insert hard nodes or cusps, the needle will penetrate at those nodes, so you get less desirable embroidery and an increased stitch count. Another reason to use minimal nodes is for editing purposes. Suppose you test sew your design and realize you need move overlap for registration issues – the fewer nodes, the easier and faster the edits can be accomplished.
Editing paths with Bezier handles exposed is not hard, and is very intuitive once you get past the first few minutes or so.
Editing is accomplished by dragging the handles, which adjusts the curve as you drag. You can also drag the outline itself into place, which will adjust the handles for you. When dragging the outline, the closer you are to a node, the more that node’s handle will be adjusted, rather than the one you are farther away from. Because this can make your handles go ‘wild’ we do not let the outline drag if you grabbed it within 5% of the ends of the outline in either direction. It is best to grab the curve somewhere in the middle and drag it, then adjust the handles to perfect the shape.
Note: Sometimes art will have the handles ‘hidden’ under the nodes. Drag the outline and the handles will move, exposing them so you can drag them around as needed.
Here’s a step-by-step example of making use of minimal nodes while drawing, and good use of re-shaping: Make a heart, starting at the bottom, using all Cusps (Shift key). You only need four points! Ctrl-right-click to close the outline:
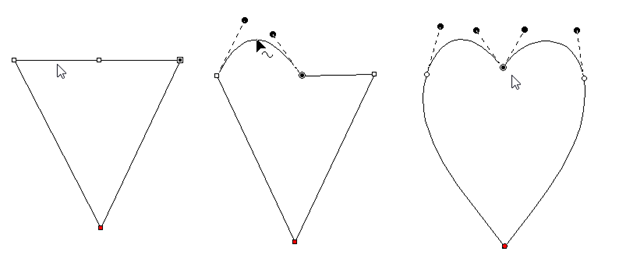
Next, hover your mouse over the curve in between the top left two points as shown, and drag the curve up. You will see the shape beginning to appear. Repeat the drag for the other side. In the example above, we’ve made the sides smooth too. Do any editing desired for the overall image, and you have a low-node-count shape that looks great!
There are also some tricks that we would like to share.
Trick 1: A favorite old movie of ours, Ghostbusters has the line, “Don’t cross the streams!” In the movie, it implied that ‘Bad Things’ could happen. What we’re saying here is, “Don’t cross the handles.” It’s not that you cannot cross the handles – you can – but certain object types will not understand what it is you’ve done. So we discourage it.
Trick 2: Another thing to consider is that the handles should generally be in the direction of the travel of the path. If you have your handles pointing away from the travel of the stitches, then the stitches may do a “Two-Step” which you might not want to happen.
Trick 3: Sometimes you will inadvertently wind up with a handle hidden under the node it is attached to: it is a handle with no length. You can recover these by mousing-down in the middle of the curve and dragging the outline, which reorients the handles for the curve you are dragging. Once the handles are exposed, you can position them as needed.
Trick 4: Use nodes where the path switches from turning left-to-right or vice versa. And then when turning, place a node at the ‘widest’ point in the turn if you need an additional node. If you have extras, you can delete those and adjust as desired.