 A
Fill is a repeated run stitch back-and-forth in rows, used to cover a large
area. There is a lot of terminology associated with fills, such as “complex” (it
can have holes), “Tatami” or “Ceeded” (The runs are offset so the rows don’t
line up), “Edge Travel” (the stitches run along the edge instead of under the
rows), etc.
A
Fill is a repeated run stitch back-and-forth in rows, used to cover a large
area. There is a lot of terminology associated with fills, such as “complex” (it
can have holes), “Tatami” or “Ceeded” (The runs are offset so the rows don’t
line up), “Edge Travel” (the stitches run along the edge instead of under the
rows), etc.
The main issue is density, or the distance between rows, and
here is where you get to make a decision. When a fill executes, it puts a lot of
stitches into the fabric. Those stitches displace the fabric somewhat, just like
when you get into a bathtub, the water has got to go somewhere – stitches in
fabric are the same. So the more stitches you put into the fabric, the ‘bigger’
the fabric has to become to handle it.
Remember that density is measured in stitch points, which are
tenths of a millimeter. The bigger the distance, the lower the density.
In the past, the typical production method was to use a
cut-away stabilizer that can hold together with a lot of stitching in it, which
relieved the fabric considerably. Then, the designer could use densities of 4
points or even tighter, thus creating “full coverage.” Full coverage means
the fabric does not show through. It sounds good and if you’re being paid by the
stitch, it is great. But what if you want the fabric relaxed, not stiff as a
board? And full coverage isn’t as important as wearability and softness? Then
plan on releasing some of the density. Go for 5 point density or even lower.
There are other options too. Using two fills, in
different directions, but each with only half the density, you can create a far
more stable fill with less displacement. And the coverage works out quite
nicely.
If your fill sews out like a soup bowl, indented and firm, you
needed less density and more stabilization.
When a fill executes, it does so in sections. This is driven
by the shape of the object, and where the Exit point is located. When the fill
has to travel between those sections, it can either run under the rows of
stitches that haven’t been filled yet, or it can run along the outside edge of
the shape.
If the fill is a normal density, even, one of the lighter ones
previously discussed, the traveling runs probably will not be visible and
certainly not noticeable, so the most efficient thing to do is let the fill
travel normally.
There are uses for fills that have much wider spacing between
rows; trapunto effects for example. In a fill that has low density – where the
stitches are really far apart -- you may want the traveling stitches to go along
the outside of the shape, rather than under the rows where they would interfere
with the desired visual effect. This is accomplished by checking the ‘Travel
edge” box.
A fill has a single angle at which it runs. You can add an
inclination using the Incline button on the Tool Pane.
When choosing the patterned topstitch, a normal fill (tatami)
is the default, however you can adjust the pattern to have needle lands that
form texture. Each pattern can have its stitch properties adjusted. Stitch
Length in the pattern relates to the size of the pattern that is made. If you
make your pattern too wide, it will not be visible unless the shape itself is
wide enough. To make a fill appear smoother you can also add randomness to the
needle lands for a Tatami fill.
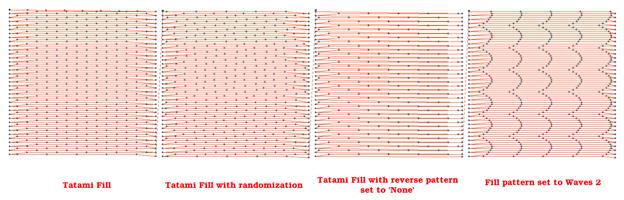
Note: There is also an option of
using fill pattern “None” which will emulate a satin. This is for very small
areas, where the stitches will not be excessively long, or for fills that are
only going to be carved.
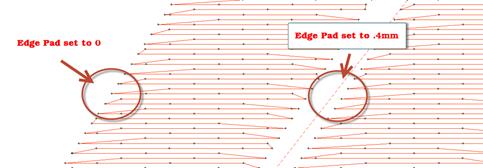
The Edge Pad is a means of protecting the edges of the
stitches from have excessive needle penetrations that can pull on the fabric and
pucker.
When patterning, the needle penetrations can lie next to one
another causing the fabric to lash or even cut. If this is a danger for the
fabric being embroidered, set the “Reverse” to “None” which means the pattern
will only occur on every other stroke of the satin. The pattern effect will be
lighter, but the embroidery will be better and the fabric will not have as many
cuts.
 Compensation in fills is very similar to compensation on satin
columns, which has been described earlier. Unlike columns, however, there is
rarely a need for extra control such as side selection or push.
Compensation in fills is very similar to compensation on satin
columns, which has been described earlier. Unlike columns, however, there is
rarely a need for extra control such as side selection or push.
Fills can have curved rows of stitching, not only straight
ones. Switching to a curved fill is done with the “Curved” checkbox. When you
select the fill to be curved, a curved line, similar to a break line, will be
created for you automatically, and it will be angled as your inclination was
previously.
You adjust the curve as you would with any line. You can add
points and remove them. The curve is fully adjustable, but realize there are
some rules you should follow.
1. The
endpoints of the curve should go past the edges of the shape.
2. The
curve needs to be simple – making a loop may be fun, but it won’t be nice to
sew.
3. Hard
turns will give you areas of low density on the angle, and high density as they
straighten out, so use things like that with low density as second fill, for
texture and dimension.
Here are some examples of curving fills in action. The
stitches and the outline are shown side-by-side for each. Notice the curve on
the right has an additional node added to produce an ‘S’ curve:
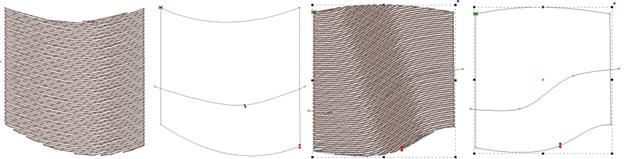
When you click off the curved fill, the line will be replaced
with an inclination.
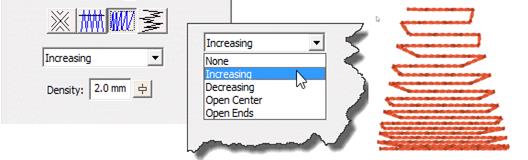
Gradient (Level 2)
The density of the fill can be adjusted so that each line of
stitching moves farther apart from the previous line, which makes for a varying
density, called a “Gradient.” Gradients are an effect, and not used to provide
coverage as a regular fill might. When making a gradient, you have two
densities; the starting density, which is the one set for the fill, and the
final density, which is the one set in the Gradient property. The gradient can
have different styles selected using the list box. Note that a standard fill has
a gradient set to “None.”
Feathering is the extending and shortening of the edges of the
fill in a random manner. This is used in fills that are adding texture to a
design, and generally would be used over some other design objects for
coverage.
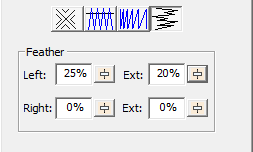
You can adjust independently the left and right inside
feathering and outside feathering values. By feathering the edges, you can
create simple fur effects.
When setting feather options, realize that left and right are
subjective, and if you edit the outline after making this setting, those could
actually switch.