
You will probably be creating lettering at some point, which constantly joins satin columns. But many other design types require this as well.
When columns meet up at nearly right angles, there can be a gap that forms as the fabric is being ‘parted’ in two opposing directions. Sometimes you can overcome this by stretching the later object so that it comes slightly over the earlier object. When doing this, you only need a few stitch points of overlap. As the stitch forms on top of the earlier column, the stitch will ride down and seat quite well, filling the gap.
Sometimes you have meeting columns that have low enough density that there will be something of the fabric visible. If you need to completely cover the fabric, insert a set of stitches as a separate object as a form of underlay. Usually you will do this with the same angle as the early column will stitch. This acts to bind the fabric down and provide the color needed when the columns intersect.
As in the case of a letter ‘k’, sometimes satins will come together at acute angles. You might have the impulse to attempt to turn the joining column. Sometimes this will work, but there is another way: Simply keep the angle constant, and overlap the joint. The ideal situation is where you have the acute angle column being sewn before the straight one. This allows for easy (and greater depth) or overlap.
Where the part that is coming in at a steep angle will be sewn later, the joint is more difficult, but works the same. You simply have to be careful about your shape. Sometimes this is the case where turning the angle near the end can be helpful for a smooth joint.
As with right angles, the use of an underlay object can provide better coverage, and make the joint easier to accomplish.
When creating a shape like a simple letter ‘T’ you can do it with two objects. Assume the vertical stroke comes first for this example. Let the Exit point of the stroke occur naturally – at the top, on one side or the other. Then, make the horizontal top column. Set the Entry point of the top column to match the Exit point of the upward stroke. This allows for continuous sewing. You still may want an underlay object, in addition to the underlay provided by the objects themselves, but the simplicity of the connection is nice to understand. Also, if the design permits it, ending the pattern in the inside of such a corner as where these two strokes meet allows for tie-off stitches to be nested nicely, and in fact they also double as color fill in the intersection. A lot of ‘old school’ embroidery fonts were digitized this way.
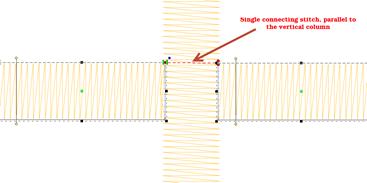
Sometimes you have to cross over an earlier stroke. This is a common problem when digitizing a Celtic knot, which has art that goes over-and-under repeatedly. One trick that is used is to have the Exit point of one stroke align with the Entry point of the column that is going to pick up on the other side. This means an exposed connective stitch will go across the ‘Over’ column, but its angle will be similar to the angle of the satin stitches that it is going across, thus it blends in. As long as the stitch will be short, usually under 3mm, you can avoid adding an object for it. Otherwise, simply add a Manual stitch object with two points, and make sure you go the right direction across.
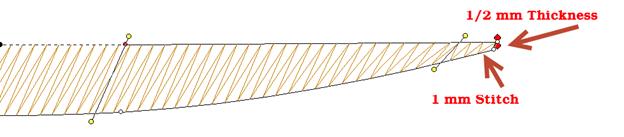
Satin stitching is hard on fabric; it pulls the fabric, it pushes the fabric, the needle comes down so close as to cut it sometimes. Narrow satin stitches are the worst, as the fabric is pulled tightly under the tension of the thread, and the needle comes down in a very dense pattern. Depending on the fabric you are embroidering, a narrow column of stitches (perhaps as wide as 1mm) can be too much stress for the fabric and can cause puckering or gathering. A more generous 1.5mm of travel is preferred. This mean that any ‘points’ in your shape will want to be clipped a bit so that the stitch has a bit of travel. If you are wondering what 1mm looks like, it is slightly wider than the needle you are embroidering with. If you think about it, a needle width isn’t a lot, but giving the extra length of stitch can do quite a bit for the sew-ability of your design.
Sometimes your column will narrow down toward a point, and there is some relief that can be given here with inclinations. If you angle the stitching slightly as it comes into the point, the stitches stay a bit longer, while the column continues to narrow. This effect is known as chiseling, and it is effective.
Also, narrow satin columns will appear to be of a higher density when sewn, so you may want to open up the density a bit.
Note: The program will automatically loosen the density as the shape narrows.
Also be aware that narrow satins will not register as well as wider ones against other stitching. When creating a satin border, try widening the stitch a bit and overlapping the adjacent stitches. This will help prevent gaps without requiring additional stabilizer.