 The
ability to edit individual stitches is a very useful tool. Sometimes there are
parts of a design that you simply do not want. Other times, there are jams of
stitches that simply cannot be removed any other way. In still other cases, you
want to add a few stitches to get rid of gaps or increase coverage in an area
that’s not necessarily a fill. Maybe you just want to make a pocket topper?
The
ability to edit individual stitches is a very useful tool. Sometimes there are
parts of a design that you simply do not want. Other times, there are jams of
stitches that simply cannot be removed any other way. In still other cases, you
want to add a few stitches to get rid of gaps or increase coverage in an area
that’s not necessarily a fill. Maybe you just want to make a pocket topper?
To begin editing a design’s stitches, click the Stitch Edit
button on the toolbar. This will cause the Tool pane to display the Stitch Edit
controls, and the main view will show the stitch points.
Stitch points can be turned on or off from the View menu.
They help identify the individual needle penetrations in the design.
Stitch selection is accomplished two ways:
1.) A range of
continuous stitches.
2.) A graphical
section of stitches (lasso, rectangle, brush selection).
You can select a range of stitches by clicking an ‘Anchor’
stitch, and then use the keyboard to select additional stitches. (See the
keyboard reference at the end of this section.)
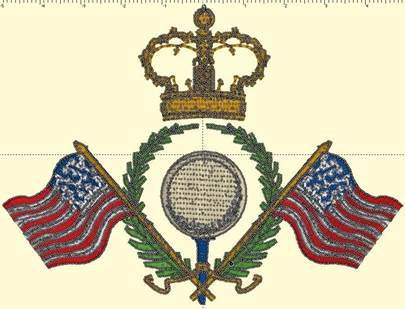
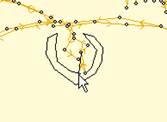
Here you can see that we’ve selected a range of stitches
inside the golf ball, but we’ve skipped the satin stitches that go around the
edge. If we hit delete on the keyboard, we can remove them!
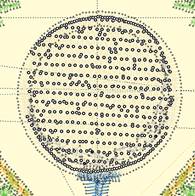
Another way to select stitches is graphically. You can drag a
rectangle or a lasso around stitches to select them. You can also use the Brush
selection, which selects anything the cursor touches, or with the Ctrl key, the
brush can de-select points. Selected stitches can be deleted with the ‘delete’
key or split using the ‘Split’ button.
Select stitches for an entire object or design using the
Object View. While in Stitch Edit mode, simply select objects in the tree and
the corresponding stitches will be selected.
Left:
Lasso.
Right: Selected
You can also select a single stitch by clicking on the line
representing the stitch itself. Make sure no other stitches are selected first,
and then simply click on a stitch line. The stitch point at the end of that line
will select. This makes it easier to select a single stitch out of a jumble of
stitches that may exist near each other.
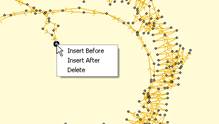
Right-click to bring up a context menu that will give you the
ability to switch stitch types between Jump and Normal stitching. For color stop
inserting, use the Sewing simulator.
When you convert a stitch to a Jump, you have the option of
ensuring the stitches on either side are tied off. If you choose this option and
the stitches are already tied off, then no stitches will be inserted.
If you have a stitch that appears not to be ties down, and you
will want to cut it, you can ensure ties using the context menu. Simply select
the stitch (as directed above) and then right-click for the context
menu.
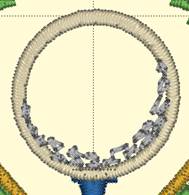
 Once
stitches have been selected, you can delete them or split them, To split them,
click the ‘Split’ button. This will create a separate design for the selected
stitches. It will also remove the stitches from the current design. If your
design is lettering or a Library design, this process will convert that design
to stitches so you will not be able to adjust that design the same as
before.
Once
stitches have been selected, you can delete them or split them, To split them,
click the ‘Split’ button. This will create a separate design for the selected
stitches. It will also remove the stitches from the current design. If your
design is lettering or a Library design, this process will convert that design
to stitches so you will not be able to adjust that design the same as
before.


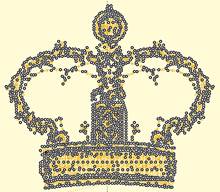
Above, the design has been split, and the crown was
copied and pasted.

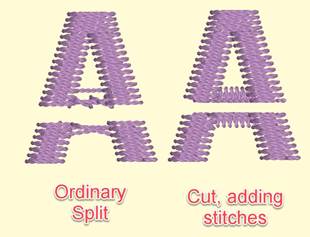
When splitting, no new stitch points are added. If
you want to use the selection shape you’ve made to actually cut the stitches,
which will insert new stitch points, use the second button to split the design.
This is useful for something like a pocket-topper where you want a clean line of
stitches instead of what might otherwise be a feathered-edge.
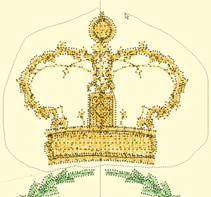
Insert Stitches
If you have a stitch selected, right-click to get a pop-up
menu that will let you insert stitches.
Notice that you can see the direction of the stitches when you
are zoomed in. This helps determine ‘before’ or ‘after’. The arrow on each
stitch points toward the next stitch as the design would sew.
Left: Right-click to select the
Insert mode.
Middle: Inserting
stitches.
Right: Stitches have been
inserted.
Using the ‘Satin’ Drop-down box, you can convert selected
stitches to a satin stitch, a choice of split satin stitches, or even add a fill
effect to an existing satin stitch.

Once stitches have been selected, you can add compensation,
which makes the outside stitches of fills or satins a bit longer or shorter.
This is useful when you have gaps in a stitch-out and you would like to
‘stretch’ the stitches together, thus reducing or eliminating the gaps. You can
also use compensation to adjust the width of lettering you may have
imported.


Left: a typically gapped design. Middle: The stitches around
the gap are selected. Right: Compensation has been added by moving the slider to
the right.
If you have edited a native object, such as one of the
built-in lettering designs, the object still retains its original digitizing
data. However, as you have edited the object, the ability for the program to
generate stitches on that object has been turned off. You can re-enable
generation using the the normal Select Mode, select the object, right click >
Allow Regenerate.
Stitch Editing Keyboard Shortcuts
Left Arrow:
Select
Backwards
Right Arrow:
Select Forward
Up Arrow:
Select Forwards 10
stitches
Down
Arrow: Select Backwards 10
stitches
Page
Up:
Select next command (jump
or color)
Page Down: Select previous
command
Home:
Select First stitch
End:
Select last Stitch
Delete:
Delete selected stitches
Shift Left
Arrow: Range select backwards
Shift Right Arrow: Range select
forward
Shift Up
Arrow: Range select forwards 10
stitches
Shift Down Arrow: Range
select backwards 10 stitches
Shift Page
Up: Range select next command (jump or
color)
Shift Page Down:
Range select to previous command
Shift Home: Range select to
first stitch
Shift
End:
Range select to last Stitch