 The
interface in StitchArtist is different in some respects than programs that have
come before, especially digitizing software. We’ll define all these terms as we
go, but if you’re familiar with them already there are some things you should
know now…
The
interface in StitchArtist is different in some respects than programs that have
come before, especially digitizing software. We’ll define all these terms as we
go, but if you’re familiar with them already there are some things you should
know now…
When creating embroidery, you normally will be doing several
types of tasks:
1.
Loading artwork as the basis for the design
2.
Creating stitch-generating “objects.”
3.
Editing the “shapes” or “outlines” of those objects.
4.
Editing the “properties” for those objects.
5. Moving
objects around on the design page.
6.
Sequencing objects for sewing order.
7.
Adjusting the “entry and exit points” for sewing objects.
8.
Colorizing objects.
In StitchArtist these different types of operations do not
require any program ‘modes’. Generally speaking there are only two modes that
you’ll run into during design creation: The normal ‘Selection’ mode when the
program starts, and the ‘Creation’ mode that you’ll use while creating the
designs.
You will not need a separate tool to reshape the outline of
designs, nor need to switch modes to size or move objects. All the tools for
design creation are accessed from either the ‘Create’ menu or the ‘Create’ Tool
Pane, which is shown using the ‘Create’ button on the main toolbar.
All selected objects have their properties adjustable at all
times, and the properties can be set on any number of selected objects
simultaneously, causing immediate generation of the selected objects.
There are also virtually no “Apply” buttons or ‘Enter’-key
requirements – stitch generation is automatic and immediate.
There are a number of features in the platform that are
consistent across the products including the Navigation HUD (a compass rose in
the top, right corner of the Main Window), the Zoom Slider, the Edit Menu, Zoom
keys, etc. Please review these areas in the program help so that you’ll know the
basic navigation of the program.
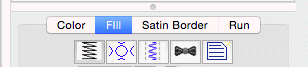
Design Pages, Designs and Objects
Objects are usually shapes that have stitch types and
properties associated with them. The object may for instance be a Run, or a
Satin Column or perhaps a Fill.
 Objects can contain lots of information: Outlines, holes,
inclinations, breaks, images, stitches and colors. Thus a single object could
contain an applique – the shape of the applique, a picture you want to print
cropped in the outline, the stitches that are generated to sew the applique and
the colors for the position, material and topstitch sewing, and even more. We’ll
discuss all that separately, so please keep reading.
Objects can contain lots of information: Outlines, holes,
inclinations, breaks, images, stitches and colors. Thus a single object could
contain an applique – the shape of the applique, a picture you want to print
cropped in the outline, the stitches that are generated to sew the applique and
the colors for the position, material and topstitch sewing, and even more. We’ll
discuss all that separately, so please keep reading.
Designs are groups of objects that are collected together.
This might be an individual design that you want to sell, or a smaller piece
that you’ll reuse as an element in other designs. Designs let the user work
within a section of an overall composition without being encumbered by the
whole. This is similar, but not equivalent to, a term used in some graphics
programs as a “layer.”
When observing the relationships between designs and objects,
see that the Object View, normally docked on the right of the program screen,
has at its ‘root’ level the designs, and when you expand a design, you’ll see
the individual objects that compose that design. If you select a design, by
clicking on it in the Object View, you will be selecting all the objects
contained in that design as well. If you select all the objects in a design,
selection of the design itself is optional. This is useful for copy/paste
operations.
When creating new objects, you have the ability to choose
where they go – into which design, and even where in that design they are
created. We’ll talk more about that in the ‘Creating Objects’ section.
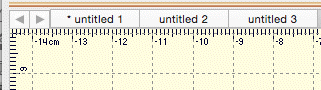
The top level of the program uses what is called a Design
Page, which is related to a document or file. The Design Page is stored as a .BE
file on your computer, and can contain any number of designs, each composed of
any number of objects. You can have as many open Design Pages (or documents) as
you like, and each is represented by a tab at the top of the main view.
Properties
The interface has a Property Page, usually visible on the
lower right part of the program window. The size of the Property Page can be
adjusted using the splitter bar that lies at the bottom of the Object
View. You can also drag the splitter bar that lies on the right of the
Main View if desired. For general interface adjustments, please review the user
interface section of the program help.
When you select objects their properties are shown as tabs in
the Property View. If you have more than one object of a given type, the
properties of the first selected object of that type are shown.
The controls for the properties mostly exist in five
forms:
1. A set
of buttons that let you choose which properties you are adjusting.
2. A
drop-list that lets you select from a set up options.
3. An
editable text field that lets you adjust a value.
4. A
pop-up slider that lets you set an adjacent text field by dragging its
value.
5. A
check box that lets you turn a property on or off.
If you adjust a property, all the selected objects of that
type will have that specific, and only that one, property adjusted. Having
adjusted the property, the stitches will generate automatically. You should see
the change in the stitches of the object immediately.
Color is a property of an object. Objects have one color each,
except for appliques, which by definition need to stop the machine. When
exporting stitches, objects of the same color that follow each other will not
cause the embroidery machine to stop unless there are applique steps
involved.
When no objects are selected, all of the colors for the page
are visible and changeable. To change a color, simply click on it in the list.

 .
. 
Design creators often need to utilize a palette of given
colors. Sometimes these represent a customer’s job requirements, and other times
it is merely a matter of needle assignment for the embroidery machine. You can
create palettes at any time using the menu Utility->Threads… And you can
choose to use any palette as you adjust the color properties.
You can also create a palette on the fly while creating your
design. If you wish to switch to an already-used color on the current page,
select the ‘Palettes’ button in the color window and you will see in the list,
“*Current Page.”
The
tool pane is located below the main toolbar. When you click the toolbar button
to create stitches, you’ll see this tool pane, which is divided into
sections.

The first section is used to bring existing images or artwork
into the program. You can load a raster image (Bitmap, Jpeg) or a Vector image
(Metafile, Adobe Illustrator) or even use a TrueType font as artwork for your
creation.
The next section contains view and mode options. You can hide
the background images or the stitches while you are creating your designs. You
can also re-sequence the objects in a mode that lets you click on them one after
the other on the Main View.
The drawing tools are next. These let you create shapes, open
and close outlines, add inclination and carving lines, etc.
The Stitches section is used to apply stitch types to selected
objects.
The Paths section is used by illustrators to convert images
into useable embroidery shapes.
When using tools such as the Magic Wand, another section
becomes visible as needed to allow for adjustments to the current
process.
Sometimes you want to pan the screen – in other words, move it
around – while not changing your zoom, or using the scroll bars. The easy way to
do this is with the spacebar key. Hold the spacebar down, your mouse cursor will
change to an image of a hand, and then drag the screen with your mouse.
While drawing shapes or dragging during edits, it is quite
common that you will need to move to part of the image that’s not on the screen.
Rather than use the scroll bars, which you can, you can also move the mouse to
the edge of the main window. When you get within a few pixels of the edge, the
view will scroll for you in the direction of the edge your mouse is over. When
not dragging, the screen will not scroll automatically.
Sometimes you want a reference line that is not on the main
grid. Place your mouse inside the area of either ruler – horizontal or vertical
at the top or right edge of the Main View. Then, drag, using the left mouse
button and you will then be setting an guide line. You can drag these guide
lines wherever you like, and if you drag one back to the ruler area from which
it came, it will be removed from the page.
 Sometimes the view of the artwork makes it hard to see what stitches
you have created. You can quickly toggle the images on and off using the Image
Toggle button on the tool pane or using the ‘b’ key.
Sometimes the view of the artwork makes it hard to see what stitches
you have created. You can quickly toggle the images on and off using the Image
Toggle button on the tool pane or using the ‘b’ key.
The stitches are usually kept in view so that you can see what
they are doing. However, sometimes you want to see only the outlines, and hide
the stitches. This is done with the ‘Stitch View’ toggle button on the tool pane
or with the ‘n’ key. This is helpful especially when editing.
Note:
Stitches
are not in view while drawing or scrolling.
 The
Continuous View is used to see how items will connect when embroidered in a
continuous hoop, or as a repeated pattern. It creates a set of duplicate images
that let you see how your design will connect or interact with an identical
copy. The image is not an actual design – it is just an image for
reference.
The
Continuous View is used to see how items will connect when embroidered in a
continuous hoop, or as a repeated pattern. It creates a set of duplicate images
that let you see how your design will connect or interact with an identical
copy. The image is not an actual design – it is just an image for
reference.

The offset setting allows you to
inset a repeated element, instead of the default, 0, which aligns the image of
the copy with the outer edge of the design.
Some digitizers advocate getting used to a particular scale or
scales while you are creating a design. This allows you to learn what a useful
distance in the real world will look like on-screen. The Embrilliance platform
has a Preference that lets you calibrate the display to a Real Scale (See the
program help on User Interface for details). Once you have done that for your
computer/monitor setup, it does not need to be done again.
To get to a particular ‘zoom’ level, use the number keys. ‘1’
is a 1:1 ratio of the size of things on-screen to the real world. 3:1 and 6:1
are popular as well. If you use the number key ‘0’ you will be zoomed to your
hoop.
Using a consistent set of scales is useful. Once you become
well used to seeing design work at those scales, you’ll be able to know what the
stitches will look like without having to sew them out. If you are zoomed too
far in, you will likely be creating more detail than the design will need which
slows the design creation process and can even negatively impact the sew-ability
of the design.
If you are editing a design, feel free to use the zoom slider
or other keys such as ‘A’ (All), ‘S’ (Selected) to work at a comfortable level.
Generally speaking, unless an object outline is very large, you should be able
to see the whole object on your screen while editing. Zooming in extra close can
be useful to make the nodes line-up perfectly, but that is not necessary for a
great design.
Note: If you have any objects
selected, using the “s” key is a quick way to center the Main View on them for
editing.
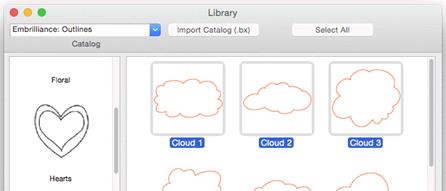
 The
Library button on the main toolbar will bring in design collections that have
been published in the platform. There are several collections included which
allow you to use them in your own work – saving you time in drawing these
shapes. When bringing in a library shape, the program uses the current page’s
view center and zoom level to determine where it will come in. Once it has been
brought in, you can size and place it as needed, even edit its outline, as if
you had drawn it yourself.
The
Library button on the main toolbar will bring in design collections that have
been published in the platform. There are several collections included which
allow you to use them in your own work – saving you time in drawing these
shapes. When bringing in a library shape, the program uses the current page’s
view center and zoom level to determine where it will come in. Once it has been
brought in, you can size and place it as needed, even edit its outline, as if
you had drawn it yourself.
The Library has been extended to include hundreds of outlines
that you can use with StitchArtist to make your own designs. They are even
royalty-free!
Working with Designs
Designs and objects will create themselves as you begin
drawing and as a result of copy/paste operations. But there are some options you
should be aware of.
Each design page, which is represented by a working file (.BE)
is selected using the tabs at the top of the main window. Each page can contain
any number of designs. Sometimes it is useful to break up your work into
discreet areas that can be managed as a unit. Designs are the mechanism for
this. For example, suppose you make a nice rose. Now you want a bouquet. You
could make the rose as a single design, and then place it in multiple positions
and sizes to complete your image.
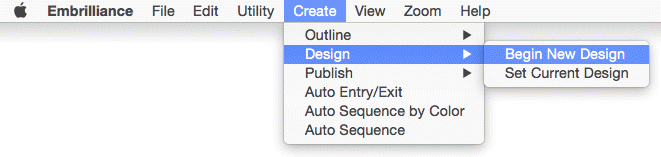
If you have no designs on the page, one will be created for
you when you either bring in artwork or begin to draw. However if you wish to
switch to a new design to begin drawing a separate piece, you use the menu
Create->Design->Begin New Design.
If you are working back and forth between multiple designs,
when you draw new objects you will need to decide where they go. To do this you
have options:
1. Select
the design in the Object View, and then use the menu Create->Design->Set
Current Design.
2. Select
an object in whichever design you wish to work, and begin drawing. Your new
object will appear in the sequence following the object that was
selected.