When you have two or more lines that should be connected, use the menu Create->Outline->Connect to make them into a single line. While you are drawing, it can happen that you end the drawing before the outline is fully created. You can simply create the rest of the line as a separate object, then select both and connect them.
When connecting lines, the head and tail of the first line in the sequence are preserved, and thereafter the lines that are being connected to it will be reversed as needed to ensure the nearest connecting point. You do not need to have your line endpoints adjacent, as a connecting line will be added for you if needed.
When you create a line, there is a point where you started and a point where you ended. If you wish to reverse the direction of points on the line, use the menu Create->Outline->Reverse Points.
Generally, the outline order is not very important for the creation of stitches. You may, however want to use this when working on connecting shapes you have made.
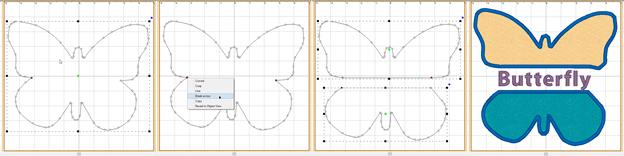
You can select two points across a closed outline and break the outline into two using the context menu option ‘Break across’. This is sometimes useful in logo or promotional designs, where you have original shapes, but want to separate them and insert a word or other design element in between.
If you have an open shape selected, with one or more nodes in it selected, the context menu option, ‘Break at point’ will split the object into multiple objects.

The menu Create > Outlines has Reconstruct Outlines to take vector shapes and try to recreate them with fewer points. If you’ve brought in something traced from a bitmap, it may have vector nodes every mm or so, making an impossibly ugly outline. Copy and paste a new one directly over the original. Sometimes it is useful to lock the original so as to avoid selecting/moving/editing it by accident.
Reconstruct Outlines on the copy. This will reduce many nodes, but they’ll probably not be exactly what you want. You can now edit, and even reconstruct again, to get a clean vector shape. Use the original that you’ve locked in place as a reference shape. Once your new shape is clean, delete the original.
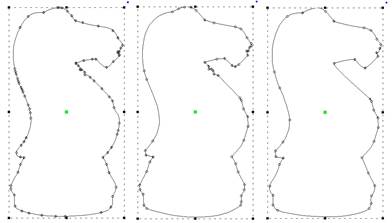
Left: original, Middle: After Reconstruct, Right: With minor edits
 Holes or ‘voids’ can be added to artwork for stitch types that use
them such as Fills.
Holes or ‘voids’ can be added to artwork for stitch types that use
them such as Fills.
In order to be able to add a hole to a shape it must not only appear closed, but actually be closed. You can tell by looking at the ‘Close outline’ button on the Tool Pane when the object is selected. If the button appears depressed, the shape is closed. If not, you can click the button to close the shape.
Not all stitch types allow holes. When it is allowed, the ‘Add Hole’ button on the Tool Pane will be enabled. You can push this button and then begin drawing the hole. Right click to complete your drawing as with any drawing operation. To add another one, simply click the button again. There are no limits to the number of voided areas (holes) that can be on a shape.
The hotkey for adding a hole to the currently selected object is ‘o’.
If you have drawn several objects, or used path operations to create them and you want to combine holes from multiple objects, select all the objects and use the menu Create->Outline ->Combine Holes.
Holes can be removed by selecting a node on the hole and using the right-click pop-up menu entry, “Delete Hole.” To remove all holes from an object at once use the menu ‘Create->Delete Holes’.
Similarly you can separate the hole into a new object, as an outline, with the right-click pop-up menu entry, “Separate Hole.”
If you have multiple objects with original art that has holes, but you would like to separate them out as individual objects, use the menu Create->Outline->Separate Holes.
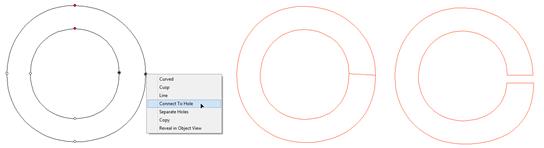
Sometimes you’ll need to turn a shape with a hole into a continuous outline, such as to make a satin stitch. To accomplish this, select two near points, one on the outline and one on the hole. Then use the context item, ‘Connect to hole.’ The hole is now part of the outline, as shown:
The menu Create > Outlines has a convenience command to remove all the holes from an object in one step.