There are many great fonts in the world, and lots of design companies are digitizing fonts as regular stitch files. The difficulty with these comes in using them: The letters must be imported one at a time, there is no baseline, the sewing order can be messed up if you copy and paste; sizing and color sorting are issues to be managed too! Plus, it would be nice to use the envelopes and text path tools that are used for the built-in keyboard lettering fonts.
For this reason, we have created AlphaTricks. This window is brought up from the Utility menu item, “Import Font…” and it lets you import fonts as well as manage ones you’ve already imported. Let’s take a look at this Import Font dialog box as it contains the mapping shortcuts as well as other useful information and tools. The following numbered picture is shows you the tools and buttons in groups as they will be described below:
1. This shows you the name of the folder that you have selected. Below this is name of the font as it will be shown in the font list in your program. You may change the font name and this information will be saved with it and displayed in your font list.
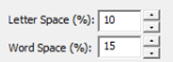
2. We have set the default spacing between letters and words which will be perfectly fine for most fonts that you map. If you find that these settings need adjusting, you may do so here and these values will be saved with your font.
3. Here we have the buttons for adding a New font, Saving your mapped font, Deleting a font you have previously mapped and Add Designs to an existing mapped font.
4. The trashcan button allows you to remove the current letter from the mapping process. The Letter: shows you the name of the current design – once it has been mapped, this field will show you the character on the keyboard that corresponds to the currently viewed letter.
5. The MGM pulldown is for mapping monogram alphabets – is the current letter a Left, Center, or Right monogram letter.
6. The Map: buttons are “quick mapping” tools that you can use for fonts that have been named sequentially and are displayed as such in this dialog.
7. The key mapped is labeled above the design. Also, the size of the currently selected design is shown. You can use this information to consistently position letters on the baseline, or offset from it while dragging.
8. If you have a large number of fonts, you may want to hide some of them temporarily from the font list in the properties of lettering designs. Check ‘Hide this font’ to do so.
Let’s get started. Click the button ‘New Font…” This brings up the window that allows you to browse and import design files. Since you are importing a whole font, find the folder with the font and click ‘Sel. All’ to select all the designs. If your folder contains designs that are not specifically part of the font itself, you might want to use the ctrl-click to de-select those files.

It is important that all the files for the font are together in one folder for easier and complete mapping. If you discover that some files are missing, for instance the “0” - “9” designs, you can open this font at a later time, choose Add Designs and resave your font.
Once you have the designs loaded into the window, you will have to map them to keystrokes. The field marked “Letter:” lets you type a character on your keyboard which will map to the current design. The current design is boxed in by black lines in the view on the right. In the picture at the start of this section, the number ‘0’ is selected.

If you have a set of designs where all the letters or numbers line up next to each other, you have some shortcuts provided for you to map the keyboard to the designs. You’ll see the buttons “A-Z”, “a-z” and “0-9.” As an example, click on the design that is the letter “A” to select it. Then click the “A-Z” button. This will automatically map the A-Z letters to those 26 designs.
If your designs are organized in some other order then you will have to manually type those keys to map the font. Select each letter, then type its key in the ‘Letter’ box.
Lettering has a ‘Baseline’ which is an imaginary line where all the letters line up so that they are readable. The text you are currently reading has a baseline at the bottom of most letters. Some letters such as ‘j, y, p and q’ have ‘descenders’ that extend below the baseline. Sometimes a font, particularly a monogram, will use a baseline not at the bottom of the letters, but at the top (or more likely, center) of the text. Use the ‘Baseline’ drop box to change the baseline if you are importing a monogram font that should be centered vertically (center) or align at the top (Top).

Sometimes individual letters require adjustments for their baseline. In the view, the pictures of each letter are shown, with a black line representing the baseline. Click on a letter to select it, and once selected, drag the letter up or down as necessary to place it relative to the baseline as you like.
Some things like apostrophes always need adjustment, naturally, but letters with descenders like “g” or “y” will usually need adjustment also. To move more slowly, hence more precisely, hold the Ctrl key while dragging.
The spacing of letters between each letter and each word can be set using these boxes. The spacing is always a percentage of the font height.

Use the Font box to select a font that you want to edit. Once the font loads, you can make adjustments to the font, such as remapping letters, adjusting sizes or positions on baseline, etc. When you have the font how you want it, click “Save Font.”
If your font is missing letters that you have now located, use the Add Designs button to open the Import dialog box to select and add the missing letters. You will need to map these new letters and save the font.
Note: Fonts must be named uniquely. If you accidentally name a font the same as an existing one, it will get a (2) added to the name.
Another Note: Long font names may run past the visible space on the font selection in the Letter properties, so we recommend shortening the font names using initials or abbreviations. Do this in the Name line under the Font list box.
 When you create a lettering design, you can now use the font that you’ve
imported. Imported fonts are indicated with a needle overlaid on their icon, as
seen on the picture to the left. These fonts can do almost everything that the
built-in fonts can do, such as make monograms, circles and even be shaped. When
these letters get sized, the built-in sizing technology will recalculate their
stitches.
When you create a lettering design, you can now use the font that you’ve
imported. Imported fonts are indicated with a needle overlaid on their icon, as
seen on the picture to the left. These fonts can do almost everything that the
built-in fonts can do, such as make monograms, circles and even be shaped. When
these letters get sized, the built-in sizing technology will recalculate their
stitches.
There are, however, no stitch properties for these fonts, as they are stitch-files, not our digitized objects. So, removing hidden stitches, underlay and density cannot be changed, for example.
As you add fonts to your system, you’ll no doubt discover the need for a better method to search and select your fonts. The library window will help. It provides access to the fonts by search string, size, type (native or imported), designer (installed folder) and category tags that you create. You can even quickly access your favorite fonts.
To access the Fonts window, create a lettering design and look at the property page for it.

Font Property Page
Here, you will see the button, labelled “Aa”, that will reveal the Fonts window. In systems without access to the Font Library feature, the button remains the ‘?’ which is used to display the characters contained in the font. The Fonts window will now provide that functionality and more.

The Fonts window.
The Fonts window has five main sections:
1.) The controls at the top.
2.) The splitters between window sections, allowing you to view more or less in a section.
3.) The Categories, on the left.
4.) Fonts In Use, if any, are shown as a category.
5.) The Font List on the right.
6.) The character map of the selected font, bottom right.
7.) The Designers, below Categories.
Most of the controls are self-explanatory, but let’s take a closer look:
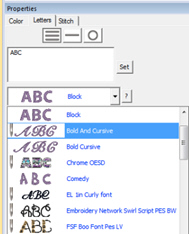
“Filter” selects font types you may be interested in, specifically native (digitized and published within Embrilliance), Imported (stitch files grouped and imported into a font by AlphaTricks) or All.
“Size” selects fonts based on height. For native fonts, the size ranges include any font within a range, and for stitch-based (imported) fonts, the default size is used, as that contains no stitch processing or distortion. Size is a selection from Micro to XL and the ranges do overlap: You may see a font in more than one size category. The exact numbers used to select the ranges are not important, as they are guides to get you into range. If it seems the fonts shown are too small or large, simply select the next size range up or down. Use the character map to see size specfics for any selected font.
“Sort” organizes the font list by name or size, in a few versions. The list will be shown in ascending order, but if you want to invert that order, select the same Sort option again, and it will reverse.
“Search” allows you to find fonts by name, or any part of the name. It also filters the results of any other criteria, such as Native with “Merr” might yield the fonts in the Embrilliance Merrowly collection.
“Reset” clears the search fields and displays all fonts in the list.
“?” is a duplicate of the same button used in the Platform lettering properties window. It shows/hides the character map. You may want to hide it if you’re looking through a large collection of fonts.
“Preview” is a checkbox that, when checked, will send a message to the main Platform window. The currently selected design will have its font temporarily set to what you select in the Font List. This lets you view any design with any font, just to see how they will appear. Note that not every font will be available at every size, so the size of the selected lettering may change accordingly as you preview various fonts.
“OK” is used to select the current font for the lettering design. This is the same as if you chose the font from the normal pop-up control on the lettering property page. This will also save the window state and position for your next use.
“Cancel” will undo any preview and return you to the Platform and property page as you were.
Above the Font List is a note telling you how many founds were found under the current search conditions, or if none are chosen, it will list the count of all fonts.

Splitters
The size and position of the window can be changed by dragging with the mouse, as any normal window in your OS. The splitters are areas between views in the window that allow you to drag more or less visibility.

Category View
The Categories view contians a tree, or heirarchial list, of words that are used to find fonts easily. These categories are merely words, similar to tags you may be familiar with on the internet. The categories are defined by you. We’ve started the first for you, and called it, “Favorites.” It has an asterisk next to it, which should keep it at the top of the list, which is alphabetically sorted.
Right-click on a category to add a sub-category under it. Right-click the top word, “Categories (tags)” to make a new root-category instead of a sub-category. There is not real limit to the number of nested levels your categories can be made, however, for practicality we suggest no more than three or four.
To delete a category, right-click on it and that option will appear.
To rename a category, click on the label text. You may have to wait a second and click again, and the OS will let you edit the label. Once you are finished changing the text, hit Enter on your keyboard.
Categories cannot be moved around. If you find you made a mistake, you can make a new category in the correct place, select the old category which shows the font list for it, then categorize those into the new one. Once they are there, you can delete the old category.
Categorize fonts by selecting fonts in the Font List, one or more, and then drag those selected fonts to a category. You can then see that they were tagged in that category by selecting the category. You’ll also see the font count change; in case you’re looking at a lot of fonts.
If you want to edit the categories that a font or fonts belong to, select them in the Font List and right-click. You’ll see the option to do so.

Edit Category Entries
In this window, select the lines, one at a time and click Delete Entry. When done, close the window. There is no Undo, so if you make a mistake, simply re-categorize the font(s).

Fonts In Use
When you have more than one lettering design in use, it can be helpful to know what fonts are currently selected, even across multiple design pages (or tabs) in the Platform. This category lets you select from the fonts in use, which can be handy if you want to replicate a look from one design to another by using the same font.
If you only have the one design, or one font, this category will not appear.
In your library folder, under fonts, is a file called, “FontTags.BL”. This file is used to store the categories you have created, as well as other information including display names for fonts. It is a text-based file, meaning you can edit it manually if you know what you’re doing. We suggest you don’t. This file can move with your fonts from one computer to another, even across operating systems, so that your work cataloging fonts can be used on all your Platform installations.
The Font List has some options. You can select one or more fonts. If only one is selected and Preview is chosen, that one will be used in the Platform main view.

Display Name Window
Individual fonts have names provided by the digitizer that created them. You may want to rename a font. Fonts won’t have their real names actually changed, but you can add a display name. This helps you identify them easier. Note that searches will look at both the real name and display name. Also, the character view will show both names. If you want to remove your display name, simply empty the text box in this window and click OK.
Discard Font is a right-click option in the Font List. When you run across a font you no longer need or want, you can discard it. This removes it from your font list, and the font will not load any longer. Fonts that are discarded are moved, along with their full folder path, into a library folder called Discarded. This folder is not emptied, unless by you. At any time, you can open the Library Folder from the Platform, find the font folder, and move it back into position. If you really want it permanently deleted, that’s your call.

The Character Map
When a single font is selected, and the Character view is enabled, the contents of the font and license, location and size are displayed in a scrollable window. You can use this information to ensure the font has any special punctuation desired, or check size availability, etc.

Designers Tree View
This view is used to display the folder structure of your Fonts folder in your library. You don’t edit this. It is simply showing the layout of the fonts you have installed, either from Embriliance products or BX installations. The usefulness of this window comes from being able to select a specifc designer or product and see only those fonts.
The font system in the Platform loooks for fonts at program startup. You’ve probably seen it ‘count up’ when you run it. For those who have many fonts, this process takes a little bit of time, from practically a blink of an eye for a few fonts to a minute or two for a couple thousand fonts. This is where the font cache comes in handy. When the program loads, it takes those fonts and puts them in a quick-to-load single cache file. This means that when the program loads again, it can use that single file instead of potentially thousands, to discover the fonts. If new fonts are added, don’t worry, they’ll be discovered and loaded too, and saved with the cache, which is re-created every load.
Embrilliance is a very fast-loading program. It does not take much time or memory to load. Still, there are those who have a LOT of fonts.
The front-cache system can cut in half, or more, the amount of time needed to load the program.
To keep things together, there is a control for the cache located on the Designers folder tree. If you right-click the tree, you will see the option to disable/enable the cache. It is on by default. If you think some font name is changed or you want to see how it loads without, you can disable it, which deletes the cache file. Ren-enable it so that on the next program load it will re-build the cache file. Note that the speed increase won’t happen until the program startup after that one, which is when the cache can first be used after creation.
There is a lot of confusion about font size and memory use. Embrilliance is different from what most IT-familiar people will have experienced. A cache of over a thousand fonts in Embrilliance may be 15Mb. Not Gb. Not Tb. Just megabytes. Font files are not large. Native fonts are fairly small, as they don’t contain stitch data. For example, the largest of the Embrilliance Christmas fonts is 138k. Imported fonts, which do contain the stitches from the original digitizer run from typically 40k – 140k and the biggest we observe may be 300k.
You do not need to offload fonts to the cloud or any similar space-saving measure.
If your PC/Mac can run, then you will not need more memory or storage for fonts.
One of our development systems has well over a thousand fonts and the storage is still only around 100Mb. That means roughly 10,000 fonts would only consume 1Gb of hard-drive space. In a world that measures hard-drive space in terrabytes (Tb) then 1Tb would hold about a million embroidery fonts. That’s likely more than have ever been, or ever will be, created.
Another thing to consider is that when the program loads, it only FINDS the fonts. It does not have them all fully in memory. Only the fonts in use in designs are fully loaded. This means that you can have thousands of fonts and the entire Platform may still only consume 100-200Mb of RAM. Again, NOT Gb: Mb. This means you do not need extra RAM for more fonts or Embrilliance in general. If your computer can turn on, you have plenty of RAM.
Similarly, many gamers need high-end graphics cards. When Embrilliance was designed, it had to operate on rather lowly systems, such as XP or Mac with integrated graphics. There is no use for a high-end graphics system with Embrilliance. Save your money unless you’re a gamer or graphics professional.
This is all good news for those of you who collect fonts: Go ahead.
Do not advise anyone to expand storage or RAM to do so. It just isn’t necessary.
Don’t. This is one reason the Font Library window exists. It makes printing unnecessary.
If you MUST print fonts, there is a way. But first let’s talk about the complexity of this. Embroidery is not TrueType or even remotely related. Embroidery fonts don’t even exist at all. Re-read that.
An embroidery ‘font’ is a bunch of designs, and each design is a lettering glyph: Characters, punctuation, alternates, etc. Fonts are all different sizes, and they are for embroidery, which is larger than typical print, so most whole fonts won’t fit on a single sheet of paper. If you resize them to fit, which you may or may not be able to do, the stitches will re-generate and could potentially get ugly. Finally, loading and generating font stitches takes a fair amount of time. Doing multiple fonts will take a while. Doing a collection of fonts could take days or weeks.
Every embroidery design, including a letter, has a perfect size that its image may be rendered at. Then, if a user wants to see that image at a different size, they can resize the image. Thus any ‘font’ may be seen as a set of images. When you purchase a font installer (BX file) on the web, the digitzer generally provides a pdf or image of the font. This page has been carefully created by the digitizer. Use it.
Okay, you’re a digitizer and you want to have some steps. There are two ways to make a simple image of your font for PDF or web. If all the glyphs in your font will fit on one design page, lay the designs out as you would like the page to be seen. Maybe two lines of uppercase, two lines of lowercase, and a line of numbers, etc. Now you can use one of the Embrilliance Platform options: Print (we advise PDF using Fit-To-Page) which will work regardless of what product serial numbers you have, or if you have an Embrilliance product that lets you save an image, save a jpeg or png.
If your font will not completely fit on one page, (most do not) then make a set of images, one for each glyph or maybe a line of glyphs, then composite the images in a photo or vector program to create a final version.
In summary, save the trees, use the software.