Multi-Position Hooping
So, you saw it on the Internet and had to have it.
But it’s too big for your machine…
Embrilliance Enthusiast has our patented design splitting technology built into it. This system automatically splits designs into multiple positions for sewing as separate designs which tile together to make a larger design. In the past, splitting a design took hours of editing by a person schooled in the process.
Our splitting drastically reduces the visible ‘seams’ that occur from manually splitting files using an editor. In most cases, the final product is indistinguishable from one created on a larger-field machine.
Some hoops have multiple positions. This means that you only hoop the fabric once and generate the design by sewing it in those multiple sections. However, you can achieve the same result by re-hooping the fabric multiple times to create the design. We call this a “Virtual Hoop.” The Essentials version of the program comes with many hoops and virtual hoops pre-defined. The Enthusiast version has creation and editing of these hoops as well.
When sewing designs in multiple sections, often the question of alignment comes up. This is accomplished automatically with multi-position hoops, but to make it easier for regular hoops, the program will add basting stitches which will align the designs. To choose a hoop, click the preferences button on the toolbar, and the Hoops window will appear:
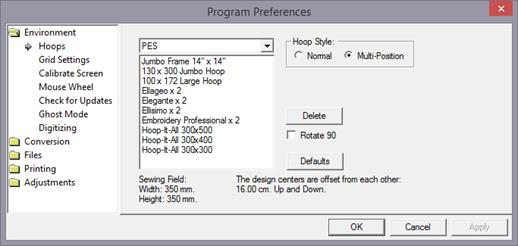
The Multi-Position hoops are separated from the Normal hoops, and you click on the Hoop Style to select which list you want to see. Here is the Jumbo Frame:
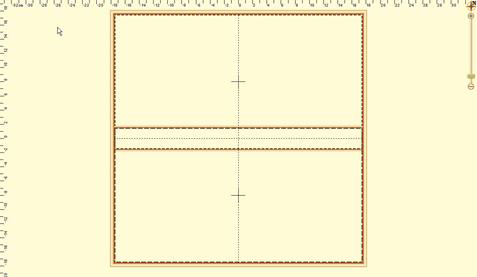
You’ll notice that this hoop has two rectangles, which overlap in the middle. Each of these represents a sewing field. To make it more obvious which lines represent which field, the inside of each rectangle has a dotted line indicating the inside of the field.
If you are combining designs to make a composition, it is always going to give the best result if you keep whole designs into one region. This produces a split which will have the least effect on the actual stitches on the design. Of course, this is not necessary, however, as the design may be split even if it lies in the middle of the hoop, but some splitting would have to occur.
The ‘+’ marks shown indicate the centers of the sewing fields.
Note: If you look at the Hoop in the selection window you will see a note that the design centers are offset from each other. This means that when you sew the two sections, the centers of each design will be separated by that amount. This is your initial placement method for each design.

In order to position your design, it is always advisable to print an actual template of the design. This helps you visualize what it will look like once embroidered, and it will help define the center position of the design on the fabric. Once you have the center of the overall design, then you will want to mark the centers for the individual fields. In the example above, this would mean that you mark the fabric 5 cm. from the center on both the left and right of the design center. This places the two designs 10 cm. apart. This basic positioning will help you get the result onto the fabric where you want it to go.
You can split the design using the “Split Into Hoop” from the Utility menu. This will open a new design page with the split files so that you can preview them or do other work before saving.
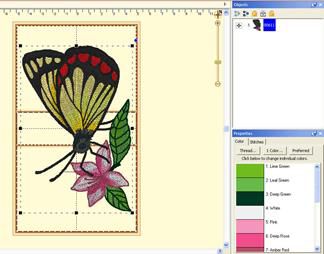
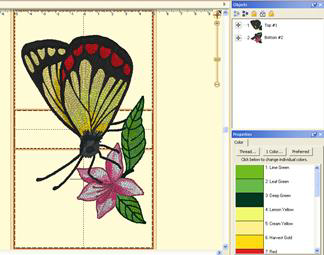
Left: A single design placed on a 100x172 hoop. Right: The design has been split.
In the example above, the 100 x 172 PES hoop was chosen, and the design was centered in it. Then the menu item, Utility->Split Into Hoop was chosen. This created a new design page, represented by a new tab. In that page there are two designs, one for the top hoop section, and one for the bottom. Using ghost mode, we show the designs separately:
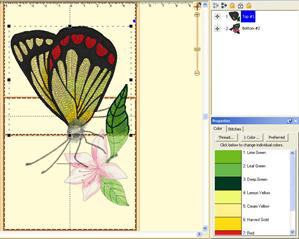
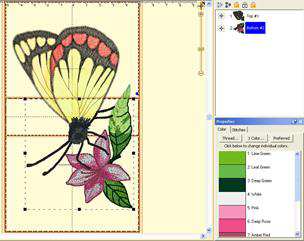
Left: The top design is selected. Right: The bottom design is selected.
When you save this page, multiple stitch files will be created, as described in the next section, “Output Files.”
When you save your files, the output files represent each region of your design.
The files are automatically given names indicating their stitching order as well as the position within the hoop. For instance, “Rose.Pes” may split into “Rose Top #1.Pes” and “Rose Bottom #2.Pes”.
Additionally, you may get a text file that explains the color sequence for your new files. In many designs, a color is only needed in one region. Where this is the case, that color will not exist in all the output files. To help reduce this “Color Confusion”, a text file is created with a table. The following is text from an example file:
“Roses.Pes
Your original file had 3 colors.
The program has split your file into 2 segments.
This cross-reference has been created for you because some thread colors in the original file were not needed in some of the split segments.
File: C:\Roses Top #1.PES
Color 1 = original color 1
Color 2 = original color 2
Color 3 = original color 3
Color 4 = original color 4
Color 5 = original color 5
File: C:\Roses Bottom #2.PES
Color 1 = original color 1
Color 2 = original color 2
Color 3 = original color 3
Happy Embroidering!”
As you can see, the table is easy to follow. Since this is a text file, you can view it in Designer’s Gallery Studio. You can also edit it (double-click to launch Notepad), print it, etc. It is a good idea to add any real thread numbers or names if you have them. Often, the digitizer of a design will supply a real-color thread list for this purpose.
We cannot stress enough the fact that the order of embroidering the files is important.
The files will overlap each other as they sew. If you embroider out-of-order you will get overlapping that is incorrect, and parts of your design will not be visible!
On hoops that have three positions, the regions are named for you: Top, Center and Bottom. On hoops that have more positions, the other positions are given numbers, starting at the top. Hence, you might have a hoop with: Top, Pos. 2, Center, Pos. 4 and Bottom. Columns have names like “Left”, “Right” or “C2”.
To get the best results, there are some things you should know.
First is that you should trim your jump stitches as you go, if your machine does not do it automatically. This is true in the course of normal embroidery, but somewhat necessary when embroidering a split design. When splitting a design, it is natural that the machine will have to go from place to place a little more frequently. This results in extra jump stitches. We have made every effort to minimize the amount of effort that it takes to split embroidery files, and apologize for any inconvenience this may cause, but please accept our assurance that your finished product will have a nicer appearance if you clean the jumps from the design.
If you are using an appliqué design, you will need to embroider each color in each region before moving on to the next color. This will ensure that the full appliqué can be applied without incorrect oversewing by the other colors.
There is a compensation control in the Hoop Properties window. This control is available on all hoops, even the factory-defined ones. Compensation is the amount that each region will overlap the neighboring regions. This is used to correct for the fact that fabric will shrink as it is embroidered. Additionally, an imperfectly hooped project will allow registration problems to occur. If you are not able to hoop your fabric, ‘Drum-tight’, then you may want to increase the compensation setting for your hoop.
Important: If you are increasing the size of a design, please don’t increase the size more than you will actually need for your hoop.
Note: There is a very important phrase in the computer industry: “Garbage in, garbage out.