When you have an object that has its properties set a certain way, you can save those properties as a QuickStyle. Using QuickStyles allows you to remember a set of property settings that sewed perfectly for a project, or simply to match prior objects you’ve created.
Adding a QuickStyle
When you create a style based on a selected object, you can name it. This is called a QuickStyle, and the style itself resides with the design page being used, and on your computer for future use. To do this, click the ‘Add’ button.
If you load a document with a style that is not on your system, it will be referred to as a “Page Style”. If you would like to add this style to your collection for use later, you can click the ‘Add’ button.
Renaming a QuickStyle
If you wish, you can rename the style with the ‘Rename’ button. Any object that uses this style will show the new name in use when the style page is shown.
Updating a QuickStyle
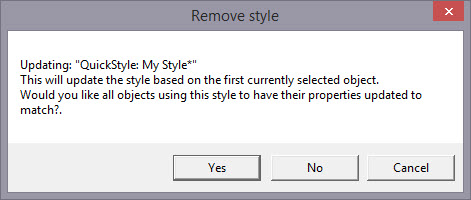
When you have modified a QuickStyle-stylized object, and you want to update the QuickStyle to match the current object properties, use the ‘Update’ button. This means that other objects with the same style set will not match. Since the main reason for styles is to have all the objects working the same, there is an option presented to update all the other objects that use the same QuickStyle to have their properties match the current one.
Removing a QuickStyle
Using the ‘Remove’ button, with the trash can icon on it, you will remove the QuickStyle from the page, and from your system. Realize in doing so that other objects on the page, or indeed other files you have created, may have used that QuickStyle.
As QuickStyles are stored with the page as well, the style will become a “Page Style” for other documents when you load them, if they had that QuickStyle applied.
When you remove a QuickStyle, it erases it completely without affecting the properties themselves. Objects that have had their QuickStyle removed will not lose their property settings, but will naturally have a style setting of “None.”
Stylesheets are design collections that have objects that have properties set to perform digitizing a certain way.
For example, suppose you want to collect a set of object types that you use to create freestanding lace. You can make a design with those objects in it. Their shape does not matter, but their properties are what are important. The objects will have the properties needed to make your lace. You can then use that Stylesheet at any time to set all the object properties on the sheet.
Stylesheets allow you to add styles to your Styles lists quickly and easily. They can also be exported in a .BX installer for use on multiple computers, or even shared with others.
Stylesheets can be loaded into the ‘current’ digitizer settings, usually at the onset of creating a new design, but not always – they can be set as the current properties at any time.
Creating a Stylesheet
Start with a new design page. Now begin by digitizing one object, and set the properties of that object to your style. You can use a QuickStyle that you have on hand already to set the properties. You can add as many objects to the design as you like. Once you have the design how you want it, use the menu ‘Create->Publish->Stylesheet’:
 ’
’
You now have two options for Publishing: Publishing to your collection of Stylesheets, or publishing as a .BX installer. The .BX option will also publish to your stylesheet list, but it additionally saves a .BX file to a location of your choosing.
Here is an example:
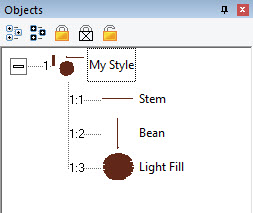
In this screenshot, you can see we have two Run objects, labeled ‘Stem’ and ‘Bean’. We also have a Fill object, labeled, ‘Light fill’.
IMPORTANT: Save your working (.be) file so you can adjust this Stylesheet at a later date if you need to.
When we publish this Stylesheet, we have these available as QuickStyles:
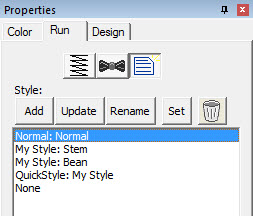
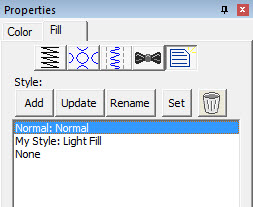
Notice there are now two entries on the Run (left) and one on the Fill (right).
Setting a Style as Current
The menu ‘Create->Styles…’ calls up the Stylesheet manager:
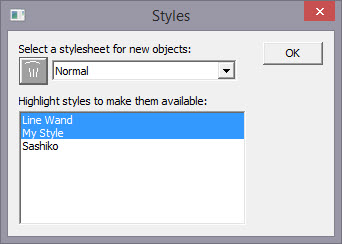
This window is divided into two sections. On the top is a list of the Stylesheets available to be used to set the ‘current’ properties. The lower list allows you to highlight any and all Stylesheets you want to have available for use while creating a design.
Thus you are not limited to a single Stylesheet, nor are you restricted to using it only at the start of a design page. You can set the properties to a style at any time by selecting it in the drop list. And you can highlight as many stylesheets to be available as you like.
You will notice there are some Stylesheets that exist for you; Normal (which is the default properties for the program) and ‘Line Wand’ which is handy to use when generating objects with the ‘Magic Wand Lines’ tool. You’ll notice that in the image above, there are two Stylesheets selected, “Line Wand’ and ‘My Style’, so here is what we see in the Run properties:
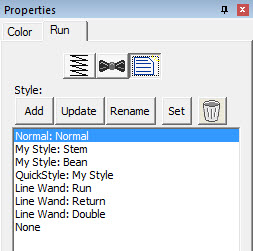
Notice that there are ‘My Style’ and ‘Line Wand’ available. Also, we had chosen ‘Normal’ as the Stylesheet to use as a current property set, so the Normal is there as well.
Note that QuickStyles are always available to you; they are not a particular Stylesheet, but rather a simple set of properties for one object type.
Removing a Stylesheet
When you select a Stylesheet that you have created, the trashcan button next to the drop list will be active, allowing you to remove that Stylesheet from your system completely. (Remember, we told you to save the .BE file in case you want it later!)
Path operations are advanced graphical tools that help you quickly get a result shape based on currently selected ones.