Delayed Generation
 When you tell an object that it is to
be a certain stitch type, the stitches will automatically generate. Also when
you adjust or edit the object, the stitches will generate for you. But what if
you want to do a complex series of edits on the object? It might be desirable to
turn the automatic generation off for a while. You can do this with the ‘Delayed
Generation’ button. As long as the button is pressed, and you are in ‘Create’
mode, your stitches will not generate.
When you tell an object that it is to
be a certain stitch type, the stitches will automatically generate. Also when
you adjust or edit the object, the stitches will generate for you. But what if
you want to do a complex series of edits on the object? It might be desirable to
turn the automatic generation off for a while. You can do this with the ‘Delayed
Generation’ button. As long as the button is pressed, and you are in ‘Create’
mode, your stitches will not generate.
Generate Now
 When
you want to generate stitches on an object or set of selected objects, click the
‘Generate now’ button. If nothing is selected, the program will look for any
objects needing to be generated and will generate them accordingly. This button
is useful when Delayed Generation is turned on – you control what gets generated
and when.
When
you want to generate stitches on an object or set of selected objects, click the
‘Generate now’ button. If nothing is selected, the program will look for any
objects needing to be generated and will generate them accordingly. This button
is useful when Delayed Generation is turned on – you control what gets generated
and when.
Default Drawing of Line/Curve
 The
usual mode of drawing with points is to draw with curved points and use the Ctrl
key to draw a line. This may be undesirable for some art. You can use this
button to switch the way that operates – pressing it will cause drawing to
default to a line, and the Ctrl key will cause points to be a curve. Note that
using the Shift key to make a line constrained to 15 degree angles will work
either way – you can constrain the line angle as long as you are not making a
curve.
The
usual mode of drawing with points is to draw with curved points and use the Ctrl
key to draw a line. This may be undesirable for some art. You can use this
button to switch the way that operates – pressing it will cause drawing to
default to a line, and the Ctrl key will cause points to be a curve. Note that
using the Shift key to make a line constrained to 15 degree angles will work
either way – you can constrain the line angle as long as you are not making a
curve.
Auto-scroll Toggle
 When
drawing, the edges of the main view have an area that act as an auto-scroll area
– if you move your mouse in that area while drawing your page will scroll
automatically which gives you more room to continue drawing. Sometimes this is
undesirable, and the action can be toggled on and off using this button. Note
you can also use the arrow keys while drawing to scroll 1cm per key click. And
holding the spacebar will let you pan the screen by dragging it with the
mouse.
When
drawing, the edges of the main view have an area that act as an auto-scroll area
– if you move your mouse in that area while drawing your page will scroll
automatically which gives you more room to continue drawing. Sometimes this is
undesirable, and the action can be toggled on and off using this button. Note
you can also use the arrow keys while drawing to scroll 1cm per key click. And
holding the spacebar will let you pan the screen by dragging it with the
mouse.
Selection by Style or Type
When an object is selected, you can select all other objects
using the same style or stitch type by adding the Control key to a right-click.
Ctrl-Rt-Click > Select by…
 Areas filled with stitches such as Satin Columns and Fills can be
given additional texture using Carving Lines. Carving lines are additional
shapes that can be added to objects in a very similar manner to adding holes.
Use the ‘Add Carving Line’ button on the Tool Pane to begin a carving line, and
select the input method (usually Point Input) to begin drawing. Draw a path over
the object.
Areas filled with stitches such as Satin Columns and Fills can be
given additional texture using Carving Lines. Carving lines are additional
shapes that can be added to objects in a very similar manner to adding holes.
Use the ‘Add Carving Line’ button on the Tool Pane to begin a carving line, and
select the input method (usually Point Input) to begin drawing. Draw a path over
the object.
The carving line generates needle penetrations where the
normally-generated stitches intersect the carving line.
The only real caveat to carving lines is that in high-density
areas, your fabric may lash up as the needle is penetrating closely together.
For this and other reasons, some designers create two areas of fill, overlaid on
one another, each at half density. This adds texture, can reduce fabric pull,
and carved lines will add minimal impact.


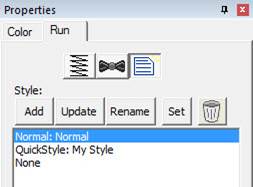
Using Styles
Styles allow for repeated use of properties on a given type of
object. There is a style button on the top, right of each object property page.
When an object has been assigned a style, that style will be highlighted in the
style list, shown on the Style properties for the object. If an object was
assigned a QuickStyle, but has been modified, it will be given an asterisk at
the end of the style name.