


Original price was: $99.95.$79.95Current price is: $79.95.
Made for 5″X7″ and larger hoops, these amazing freestanding interactive designs include a snowflake generator that can create millions of possible designs, an ornament cover creator to add lace to your favorite ball ornaments, and designs that make customizable freestanding reindeer, each with options that mean every reindeer can have a different style and attitude, along with Santa’s sleigh with its own style options. Add to that a freestanding lace alphabet and additional bonus designs, and you have everything you need to create a wonderland of thread for your holiday decorations this winter.
- Description
- How To - Snowflakes
- How To - Ornament Covers
- How To - Reindeer and Sleigh
- Specs / Installation
This amazing design collection contains incredible freestanding interactive designs ! They load like regular designs, but with the click of a button or the change of a setting on the ‘Interactive’ tab, these designs generate millions of creative variations. See the additional ‘How To’ tabs to learn more about these incredible designs and the projects you can create with them!
Can any design in your collection do this?
The Snowflake Generator interactive can make thousands of freestanding snowflakes, complete with a randomizer button; each click brings you a new combination of hubs, stems, and tips to create a custom snowflake, or you can select from the available parts to craft your own.

The Ornament Cover interactive lets you create snowflake-styled toppers and covers that toggle together without additional hardware to wrap around spherical ornaments, all you have to do is specify the size of your globe ornaments and click away!


Most impressive among the interactives are the free-standing lace Reindeer and Sleigh; with each of Santa’s Reindeer represented with unique antler shapes, body positions, Rudolph’s red nose, and even the ability to tilt each head to create a unique team of tiny reindeer. Pair these with a customizable sleigh with dimensions and decorations you can change for a made-to-order addition to your mantle or a treasured centerpiece for your table.
What would your reindeer look like?
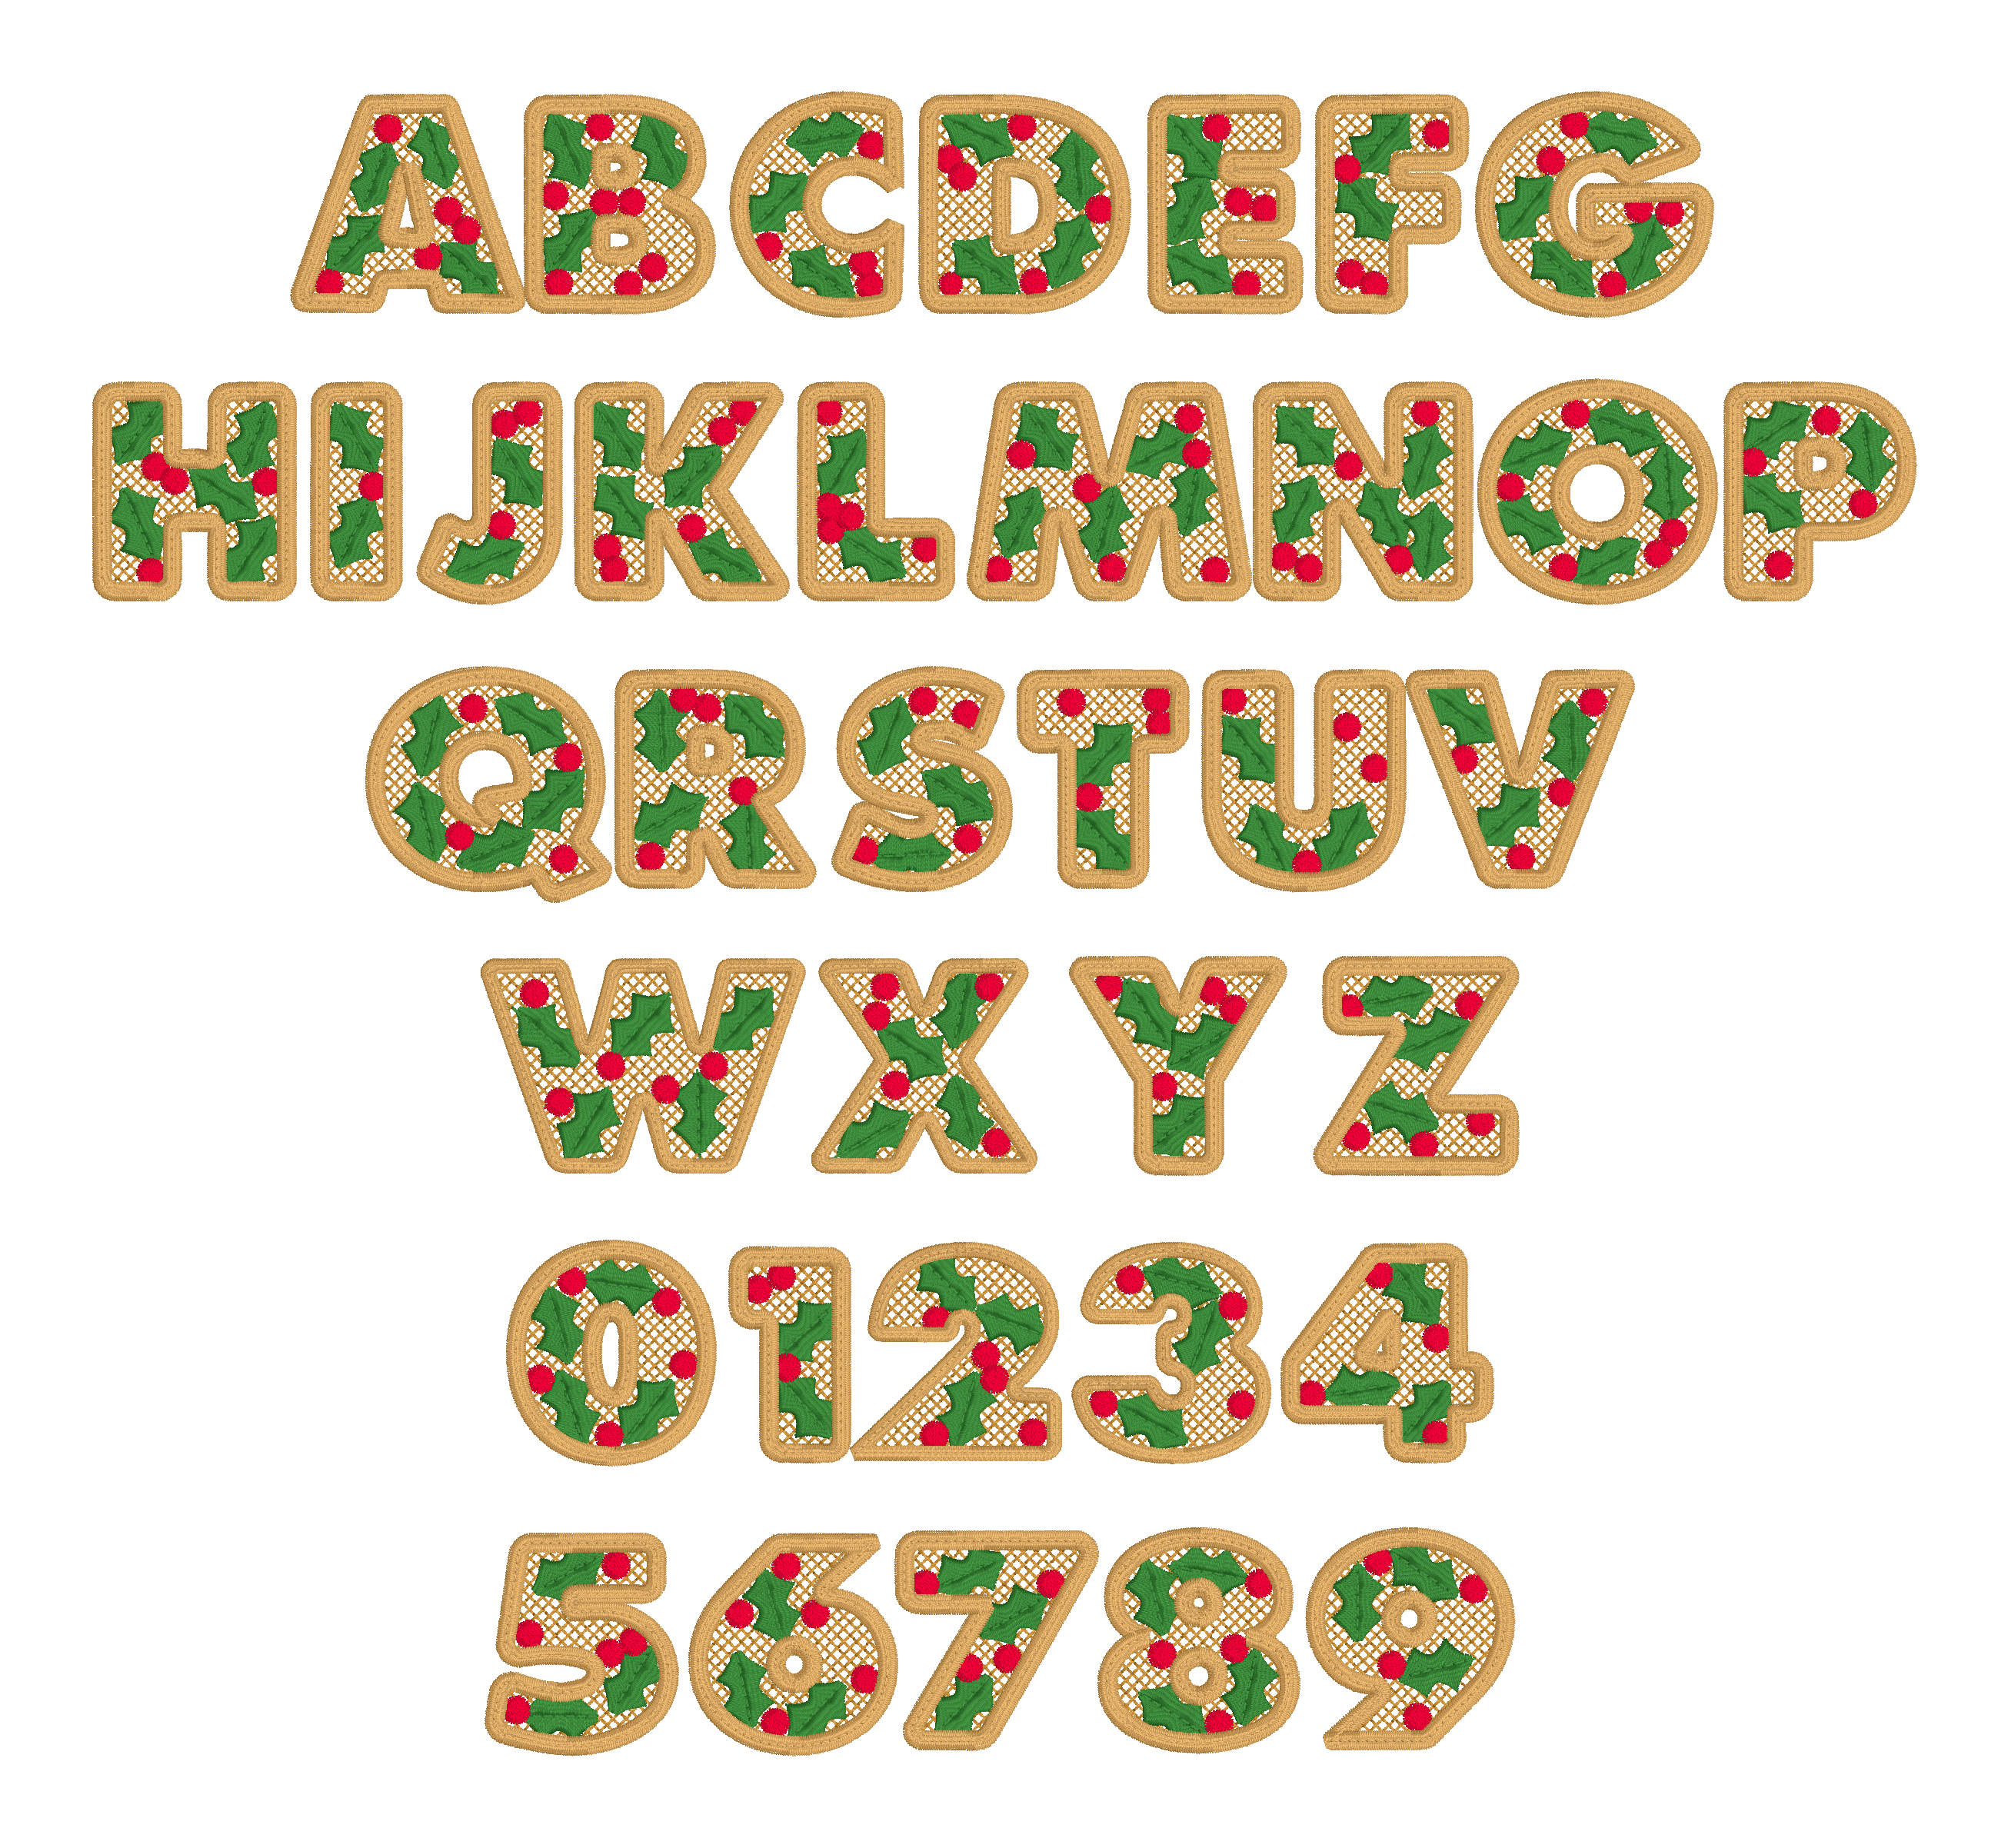
Add to these amazing designs a lace alphabet with holly accents that can be run either freestanding or on your favorite decor and a small collection of bonus designs, including a layered 3D poinsettia, a freestanding Christmas candle, a candy-cane accent piece, and a small spray of holly.
Click here to see all the letters in the Holly Lace font!

With all these designs and options, you could decorate everything!

The freestanding poinsettia’s layered look is a stunning addition to this lacy collection.

How To - Snowflakes
How To – Snowflake Generator
Merge in the Snowflake design, select it in the object tree, and it’s time to play!
The Snowflakes are freestanding embroidery, but can also be stitched on fabric.

But its real charm shows when you stitch it out all by itself! What’s it for? It can be used for a novel coaster, as a pin for a blouse, or on a hat or as a decoration for just about anything.

To paraphrase a popular TV commercial, “Betcha can’t stitch just one!”
When you select the snowflake design, you’ll see with the Interactive properties tab seen below.

This tab gives you a lot of control over your snowflakes. That said, it’s a great deal of fun to see the combinations you get generating a random snowflake using the “Make a Random Snowflake!” button. Below that button and the ‘Show Me How’ button that brought you to this page is the first important setting. In the drop-down menu, you can select ‘Freestanding‘ or ‘Fabric‘. Selecting ‘Freestanding‘ creates a design you can stitch on washaway, water soluble stabilizer to create a freestanding lace snowflake. Selecting ‘Fabric‘ will make a lighter, faster running design meant to be stitched directly on fabric.
Next are the ‘Design it’ manual controls. Here, you can alter the parameters of the snowflake and even select specific elements.
The first drop-down menu lets you make a six-pointed or a twelve-pointed flake; both of which are seen in Nature’s own snowflakes.
The second drop-down menu lets you separately save the hub and spokes, allowing you to stitch and manually assemble very large snowflakes even with a smaller sewing field.
If you want to make a custom snowflake, you can use the remaining controls to select and alter elements. You can use the sliders to mix and match the hub, midsections and tips to suit your taste and project.
The Hub (%) slider determines the size of the hub element, while the Spoke 2 (%) slider alters the relative size of the second set of spokes to allow even more variation!
Note on 12 point snowflakes: Some Mid sections and tips will overlap. This is not a problem normally and typically produces a very pretty result. Take a little extra care with metallic threads, however, as they may break more easily. Lower the tension and speed, and you’ll most likely have a perfect stitch out.

Buttoning the tips together can be done easily if you match tips with loops to tip that are balls. This works just like the ornament covers.
Have fun, Let it snow, let it snow, let it snow!!!
How To - Ornament Covers
How To – Ornament Cover Generator
Christmas Traditions features a project that creates heirloom-style Christmas Ball Ornament toppers and covers.


The ornament cover is composed of a top and an optional bottom piece. The two button together as shown to cover a ball:

The top and bottom components are stitched separately because they are typically as large or larger than the size of a single embroidery field. To created a fully covered ornament, create one of each, selected by the control labeled ‘Component’.
The Ball diameter is an important control! If you purchase mass-produced ornaments, the diameter is usually printed on the
packaging. Typical sizes range from 2” to 4”. As there are many manufacturers of these, and some are hand-blown, the diameter of
Christmas balls varies greatly. To ensure a nice fit, double check the measurement of your ornament. One easy way is to put the ornament between two books, then measure the space between the books. Once you know the diameter, slide the “Ball diam” control until the measurement matches.
Remember that some thread actually shrinks when wet, while others can stretch. If it is practical for your ornament, go ahead and button the ornament cover onto the ornament before rinsing, or while still wet. This will help the ornament cover to form to the ball contours.
The ornament will typically have a top hole or spout, which is where the ornament was blown into, creating the ball shape. This
hole needs to be measured similar to the way you measured the ornament itself. This is because the Hub of the ornament cover will
need to fit over the spout. You set this size using the “Hub diam” control.
Notes on buttoning covers together:
1.) The loop at the tip may need to be expanded slightly by pushing a pair of tweezers or a ball point pen into it. This is because the loop will shrink when it gets wet, but you do want to keep the tightness.
2.) Keep going. Sometimes it seems like it won’t fit until you’re done. The spokes have to be straight and stretched.
3.) If you have trouble with handwork, increase the Ball diameter slightly. This will make it easier for the cover to fit. If
you make it a bit too big, then you can always glue the ball into the loop tightly.
4.) Don’t be afraid to use a tool. Tweezers or needle nose pliers can be helpful, especially whe using thick threads such as metallics.
5.) Remember that the tighter it goes on, the nicer the finished product will look.
Randomly-designed ornament covers can be made by repeatedly clicking the “Make a Random Cover!!!” button. This
will not change your sizes, but chooses from a nice selection of tips, hubs and connective elements to create a random design.
There are millions of possibilities!
If you want to choose from the elements yourself to design your own cover, you can slide the Hub, Mid1, Tip1 and Tip 2 controls until you find a design combination that you like. Note that the Hub for the top is predefined and you cannot choose it; it needs to go over the spout. Also, the Mid 2 is predefined so that it does not interfere with the Mid 1 sections.

It’s always fun to see one of the prototypes

How To - Reindeer and Sleigh
How To – Reindeer and Sleigh
Part 1: Reindeer
Reindeer and Santa’s Sleigh are fun images of Christmas. Here we’ll construct the reindeer.


Christmas Traditions includes a project that consists of Santa’s nine reindeer, which you select in the dialog window:

You stitch the reindeer out in five components, each of which is its own stitch file. Of course, you can customize all the pieces into a single file if you have a large enough hoop.

The head can rotate to make the reindeer look up or down:


As you select each reindeer, you’ll see that they are all in slightly different poses and antler combinations. So each one is actually different.

Once you have the pieces embroidered, you’ll have to attach them. We recommend doing this while the reindeer are slightly damp (not wet!) and still pliable.
What you’ll need:
• A sewing machine
• Hot glue gun
• Pipe cleaners (or similar)
• Something to cut the pipe cleaner

Steps to assemble your reindeer:
1.) Stitch the body panels together. We recommend using a narrow triple zig-zag stitch. Start at the front, where the shoulders come together. As you get toward the rear end, you will notice that you are ‘easing’ the sides together, gathering the body up into a bowl shape. Keep sewing until your stitching catches the tail. This easing is what makes the nice 3 dimension rounded shape on the back of the reindeer.


2.) Glue or sew the head sides together. If you get a nice tight joint behind the nose, it stands out better. The head is created in two sides for a couple purposes:
a.) It gives the reindeer two ears.
b.) It add stability needed to hold the antlers.
3.) Slide the assembled head in between the body panels. Make sure to fit the head all the way into the body. The front of the neck should be flush with the front of the body. If you don’t get it set right, the scarf may not fit.
4.) Hot glue or stitch the head to the body, from the inside.
5.) Hot glue the antlers onto the head and button on the scarf.

6.) Hot glue some pipe cleaners onto the legs. This provides the stiffness needed to let your reindeer stand.


Part 2: Sleigh
Santa’s sleigh is a fun, but larger, design. it can be made with varying widths and styles.

Everyone knows that Santa’s reindeer are working animals – at least one night a year! And they would feel bad coming to your home without their sleigh. So here it is! The sleigh has options for the look of the side panels, and the sleighbed can vary its width for the purpose of accommodating various shelf spaces and functions.
Here is the control panel for the sleigh:


Here, you’ll see the design for the sleigh bed. The two extra buttons go toward the front, and act as a points to tie onto – perhaps hitching the reindeer with some ribbon.

To assemble your sleigh, stitch out a right side, a left side and a sleigh bed. Then button the sleigh bed into the sides. You will probably want to stiffen the sleigh and strengthen the side panels. Start by flattening everything out, once rinsed.


Normally we would prefer to use colorful or metallic pipe cleaners, but due to the COVID19 pandemic we were unable to obtain them.

Bend some wire or pipe cleaners to shape, and hot-glue in.


Sometimes you will need to push the ‘buttons’ through the buttonholes with tweezers or similar.

You can see we added a number of pipe cleaners for strength.


Specs / Installation
BX Installable Fonts
These fonts and designs are included in a standard BX installer and will install under the name “Christmas” added to the font name in your fonts list.
If you have already installed an Embrilliance Platform program and have already unzipped any compressed files, you can simply double-click the .BX installer file or drag and drop the .BX file’s icon into the main design window in your Embrilliance Platform. You will then see a window pop up to confirm your installation and be asked for your serial number to verify your purchase.
The video below contains further information on how to install and use a BX file in Embrilliance Express.
How to access your Designs
The Christmas designs are accessed by clicking the ‘Merge Design’ tool. They are located under the ‘Embrilliance: Christmas’ library.

Click the merge design icon in the right hand segment of the menu bar to be taken to the library view. In the upper left hand side of the Library window, select the ‘Embrilliance: Christmas‘ catalog to see the included designs as shown below.
Can I sell what I make with this design collection?
You are allowed to sell the stitched objects you create, but not designs derived from the collection. If you have the interactive designs loaded, head up to ‘View’ in the main menu and click ‘About this page…” for the copyright notice. It reads as follows:
Christmas Traditions
Copyright (c) 2020
embrilliance.com
Designs or their elements may not be resold in any form except as embroidered goods.
Related products
-
-
-
StitchArtist Level 2 Upgrade
Original price was: $210.00.$199.00Current price is: $199.00.


