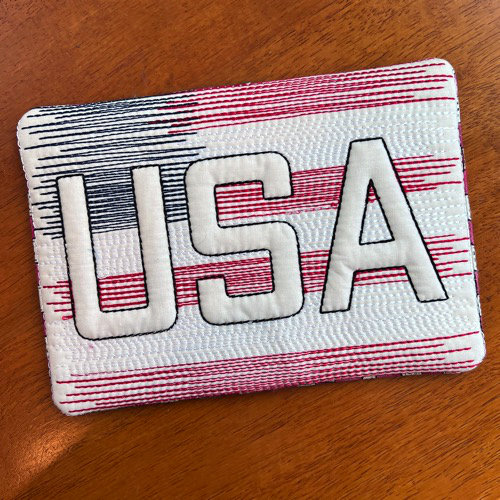
Summer means sitting outside with a drink and taking in the sun. What better way to celebrate than by making yourself a new place to sit your favorite mug? True Embrilliance fans are probably thinking they’ve seen this design before, and they would be 100% correct. Our own Lisa Shaw created the patriotic piece below using a design our Erich Campbell released in June 2020. He used StitchArtist to create this quick-stitching, large-coverage design for sweatshirts and outerwear, but it has since been used for everything from hats and jackets to aprons and garden flags! If you’d like to grab the original larger-sized design and learn about trapunto designs, the original project blog post has all the details.

Lisa was looking for a well-digitized trapunto design and decided to check out the Embrilliance project blog for some inspiration. She knew that the designs we share are always in BE format, meaning that StitchArtist users get access to all the objects and settings in the BE file, making them perfect teaching tools and allowing complete control for editing! The old-school vintage style of Erich’s trapunto flag fit the style she wanted for this July 4th project perfectly, so she downloaded the original and opened it up with Embrilliance. Lisa drew inspiration from Erich’s beautifully pathed design, taking some time to see just how he used the StitchArtist tools to put it together. If you’d like to hear her “behind the design” digitizing discussion about it, you can check out the Afterhours with Lisa replay on her SewBubbles Facebook page.
While analyzing the design in StitchArtist, she realized how easily she could turn this design into a quick stitching quilted mug rug project, complete with a flapped back for trouble-free turning. Making this style of mug rug design is a simple process. All you need to turn your design into a mug rug masterpiece is to start the design with a placement stitch line to show you where to place your fabric and a tack-down stitch line to fix it in place . After your main design runs, you then add a finishing stitch line to attach the overlapped fabric pieces that form the back. When the stitching is done, finishing is a matter of removing the piece from hoop, trimming your seam allowance, and turning the piece through the opening to get that finished look.

If you want directions for every step, you’ll find the info you need in the stitching instructions in the Notes tab in the .BE file. You’ll find the Notes tab in the ‘Properties’ panel at the lower right of your software when the design is selected, as shown below.

As always, the Afterhours with Lisa session was fun and informative, especially with the ideas and discussions happening in the comments, though some were concerned that the trapunto style might tip a mug. Lisa’s version used 2 layers of light batting under the quilters cotton top to create the raised look of the ‘USA’ lettering that she loves. As an avid coffee drinker, Lisa felt that her substantial mugs would have no problem compressing that light material, so the “trapunto bump” was no issue. The great thing about making our own projects is that we can make them any way we like! If you don’t want the dimensional look, or use light mugs and cups that you don’t think will sit as flat as our heavier ceramics, you can use a layer or two of flannel to build up your mug rug instead of batting.

If you have StitchArtist Level 1 or higher, we invite and encourage you to check out the video and create your own mugrug from the original design released by Erich. Going through the process with Lisa’s amazing session is like taking your own hands-on class at home. Even so, we wanted to offer this adapted version of the design complete with everything you need to make you mug rug both for those that just want to get stitching and for the users who don’t have StitchArtist added to their Embrilliance collection just yet. You’ll find the finished project in the download linked below.
The design is provided in our native .BE format, enabling you to save a stitch file for any embroidery machine. If you aren’t already an Embrilliance owner, we provide a free method to use our software called Express Mode that will not only allow you to use any of the wonderful free designs found in our project blog, but also enables you to install and create basic text treatments with fonts distributed in our popular .BX format produced by many embroidery design creators.
To learn more about Embrilliance Express and for the instructions and links you need to download, install, and use our software with our free project files, please click here.
