

Love is in the air this month and we are loving the trending layered, lace-motif edged applique embroidery designs dominating our social media feeds among all the Valentines day treats. Our friend Lisa Shaw noticed them becoming more prevalent as she prepared to teach her in-person Embriliance classes around the country, but wanted to add something more. To quote Lisa, “why should we stop at the traditional wagon-wheel motif?” Many who have StitchArtist Level 3 have already created this spoked and scalloped motif for themselves using its custom user-defined motif function, but Lisa created a beautiful multi-motif library containing this motif and many more for all StitchArtist owners to use. Leave it to Embrilliance to make it simple, as this library is easily installed just like any of our industry leading BX file installers for fonts, libraries, and settings!

The classic ‘wagon wheel’ motif is cropping up everywhere, particularly paired with varsity lettering and other blocky, bold applique treatments.
The Lovely Lace-Edge Library
Lisa’s free motif collection contains 8 unique lace-edge style motifs that can be used in your digitizing in any version of StitchArtist. They are not only wonderful for embellishing appliques, but make lovely decorative stitching in a crazy-patch or paper-pieced quilt embroidery designs. Each motif comes in 2 versions. The ‘Lace’ version runs centered on the line drawn in your embroidery software and is best for uses where the motif won’t be covered by any other stitching, while the ‘Offset’ version extends away from that line, revealing more of the decorative stitches when layered under a 3 to 4mm satin or zigzag applique border.

As seen below, additional stitches were added to extend the ‘Offset’ versions away from the central line, automatically increasing the revealed stitching area for use under a secondary border.

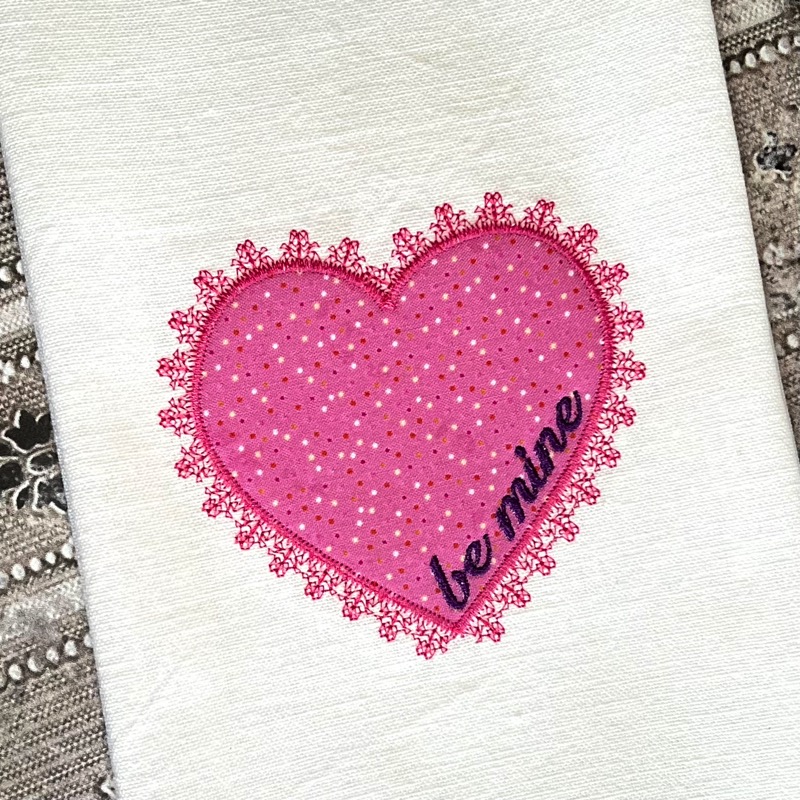
The ‘Be Mine’ Free Lace-Edged Applique Design – Step by Step
This month’s free design shows one of the offset lace motifs in action. For this design, Lisa used her ‘Lace 6’ motif in the Offset version as shown. With her traditional heart shape drawn, it only takes a quick flurry of copy, paste, and tweaking stitch settings to make the awesome applique seen in the design below.

Stitching Steps
When stitched, you’ll see that Color 1 contains the lace motif run, whereas Color 2 is the placement / tack-down line for the applique fabric. Prior to the second step, Lisa fused a pre-cut applique shape inside the placement line and returned the hoop to the machine to stitch the zig-zag finishing stitch and “be mine” lettering.


Decorative Border Flashback
For those using the motif library in StitchArtist, the steps would be similar to that shown in the following video on how to add a decorative top stitch only in reverse! Though the goal is different, the way it teaches you to work with objects is relevant to any similar layered treatment.
The Difference with Lace-Edged Designs
Instead of adding a decorative line over an applique border, with lace-edged applique, you want the motif run to stitch first. With your object drawn, imported from a font, or imported from a vector if you have StitchArtist Level 2 or above, you can copy the object, set the first object to your motif stitch, then paste a new copy of your object on top which you can set as an applique or satin border object.

With the example above, I typed in a varsity letter from a collegiate font, copied and pasted my letter object, assigned a Motif Run to the new object, then added a motif from the Blog: SewBubbles Lace 1 library. I then tweaked my motif height and width settings to get the look I wanted. For more info on Motif Run settings, see the help file here. Once that was done, I copied and pasted my original letter again to create an object on top of my motif, then applied the Applique stitch and configured it to my preferred settings for a full satin-edge. For more information on Applique objects, see the help file on Applique for StitchArtist here.
Adjusting for the Heart Design
With the lace edge motifs in this library, you shouldn’t need to adjust much for shapes at the scale of our heart, as long as you keep the default scale of the motifs and the width of your border stitch no wider than 4mm. If you are using a wider satin finishing stitch for your applique, users of StitchArtist Level 3 may want to inflate the motif object to increase the ‘reveal’ of the motif object. In StitchArtist Level 3, the inflate function makes this very simple, though those using StitchArtist Levels 1 or 2 can simply move the object nodes manually as needed or adjust the size/dimensions of the motif run to adjust the reveal, though that will change the overall look and scale somewhat.
A Note on Adjusting Motif Runs
A motif run is simply a repeated stitch element of a set size with set gap/spacing along an object. There are many ways to make your motif run more aesthetically pleasing, depending on your desired result. The following information may be helpful in creating your own motif run edges.
- Complex shapes will often create more overlapping in lace edges, particularly where there are narrow insets into the applique shape. Manual adjustment may be needed if that is undesirable.
- Open shapes with cusps/line nodes at logical points work better than auto-generated, auto-traced objects or imported vector objects that have extra nodes or otherwise less ‘clean’ lines.
- You can split objects, add segments, and shorten or extend open line objects to generate motifs where you want them. The included heart design only required a simple copy and paste of the object to create the final look. while complicated shapes with multiple corners and curves may benefit by splitting borders into multiple objects.
Multiple-object Motif Border Benefits
When you break up your border into multiple lines you can move each line, lengthen or shorten end points, or otherwise adjust each line to make motifs fit exactly where you want them. If these separate lines are created in a logical order, start close to the stop of the previous line, and are set the same color, the finished design will stitch as easily and sequentially as if the lines were in a single object.

In the example above, the left border is made of the same, singular object for both the motif run and the satin border – a simple copy and paste. You can see how the motifs overlap at the inner corner and spread at the outer corner. For the object on the right, the satin border is the same single object as the left, but the lace border is made up of three motif objects with their start and end points adjusted so that the motifs are precisely fitted to flow nicely. In the example, multiple colors were used to illustrate each object, but you’ll want to set them all to one thread color to create a continuous run in your design.
The free motif library in the download linked here works with all levels of StitchArtist. The included BX library file installs just like any BX font! After dragging and dropping or double-clicking, pay attention to the confirmation screen: it will let you know that your new motif library has been installed! Once it’s installed, close the software and restart to make your motifs available.