
Though we are often surrounded with patriotic decorations as we came ever closer to Independence Day, and we here at Embrilliance have made many such designs for your 4th of July celebrations and beyond, this free patch design is a little different.

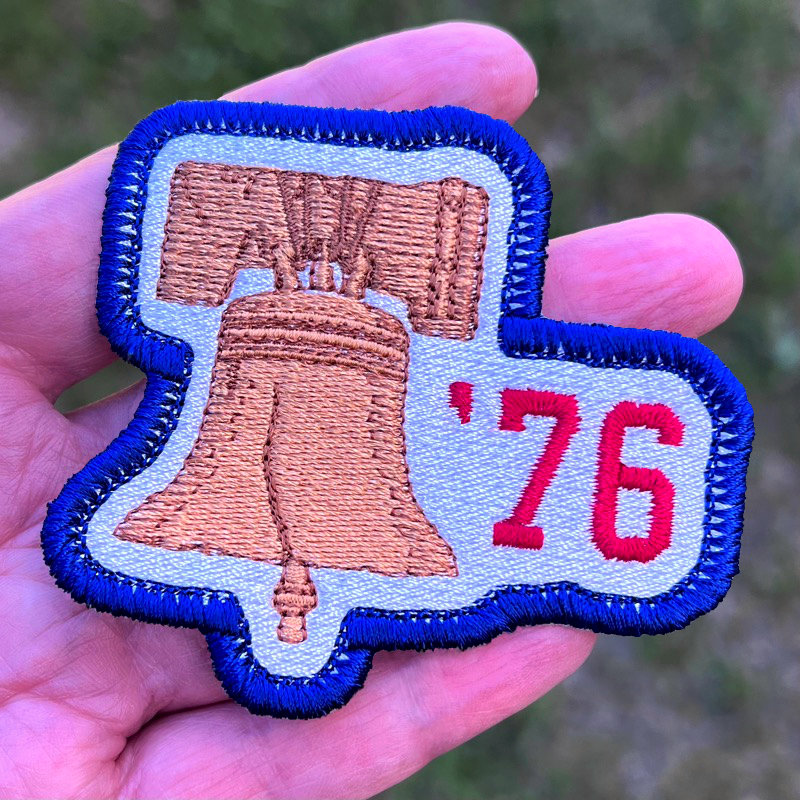
With our own Erich Campbell having just completed a move from his home state of New Mexico out to Pennsylvania, he found himself increasingly seeing that Philadelphia-housed symbol of our freedoms, the Liberty Bell. Inspired both by his own love of retro 70’s patches from the bicentennial, souvenir state patches, and the like, Erich decided to create his own 2-color, lo-fi Liberty Bell design to celebrate this important holiday and to commemorate the big move. First, Erich decided to look for some images of vintage patches to inform his creation.
Vintage Inspiration and Digitizing

With inspiration from these original bicentennial patches in mind, Erich downloaded a public-domain image of the Liberty Bell, loaded it into StitchArtist and used the StitchArtist Level 2 tools to build the bell, creating contrasting textures. He created the filled area of the background with multiple shapes so that each could have a different style. He drew each segment, changing stitch types and settings to suit the textures he imagined for the surface of the bell.

The bell itself had curved fills to create the smooth, curved texture, punctuated with satin stitch ridges to show raised areas. Though the color was kept uniform, the wooden beam above was rendered in a random-length fill with it’s own wobbly curve to create additional texture in the design. The detail work was largely drawn manually with the run-stitch tool, relying on Erich’s interpretation as he skipped lines, created his own shading patterns, and ran over lines multiple times to add thickness. The overall look is less regimental and a little more hand-crafted, owing much to those retro patches that relied on stitch-by-stitch placement in their designs due to the state of the digitizing technology of the time.
’76 Varsity Text and Patch Borders
Once the bell was done, Erich added the varsity numbers and used the Page Wrap tool from PatchArtist to create the patch base and outer border. The automation made a great shape, which Erich then retooled after converting it to an object using StitchArtist 3. Once he was happy with the outline shape, he looked to his embroidery friends to discuss the design and get some final opinions.

After some last-minute consulting on layout with the brain trust of Brian Bailie and our own Lisa Shaw, Erich published the design and Lisa did the honor of sampling this liberty bell design, complete with the varsity ’76 text in tow. Though Erich loved the patch, he decided in the end to offer both the original design with text and a no-text variant for those of you who just want the Liberty Bell.
Using the Interactive Tab
Erich published this patch design with all the options unlocked, so you can create the patch with fills or fabric, no matter how you cut your patches! Anyone with any level of Embrilliance can alter the settings. Just, select the design in the Object pane and you’ll be able to choose your patch-making style. NOTICE the Interactive Tab in the properties pane. This is where you can make the call! Check out the section on Patch Creation in the PatchArtist Supplemental PDF for information on the settings and patch-making styles. This PDF file also contains stitching guidance as well as some background information on patch making in general.

If you have StitchArtist Level 3, you can right click on the design in the Display pane and choose Convert to Objects. This gives you access to the native objects from the working file, meaning you can see how the design was digitized! You have complete access to all objects, their properties, their stitching order, etc.
If you aren’t already an Embrilliance owner, we provide a free method to use our software called Express Mode that will not only allow you to use any of the wonderful free designs found in our project blog, but also enables you to install and create basic text treatments with fonts distributed in our popular .BX format produced by many embroidery design creators.
To learn more about Embrilliance Express and for the instructions and links you need to download, install, and use our software with our free project files, please click here.