
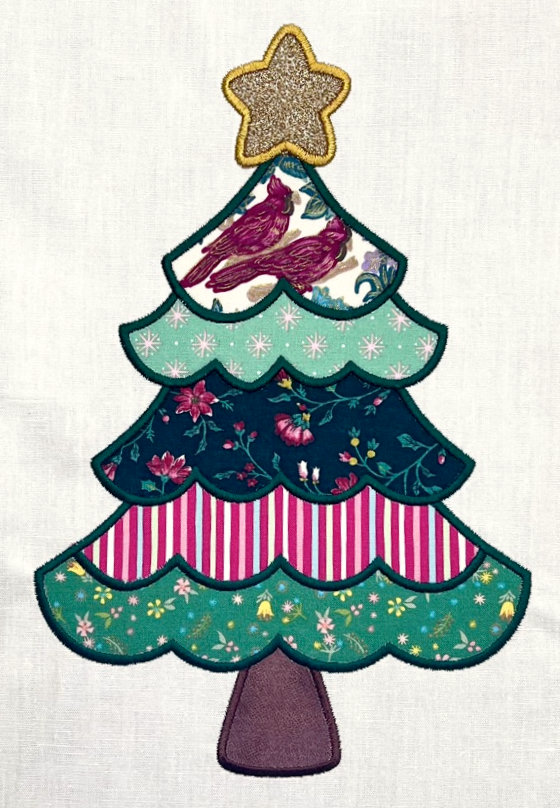
The festive season is upon us, and with it, our seasonal stitching is in full swing! Our friend Lisa Shaw created this ‘scrappy’ applique tree design using the tools from StitchArtist Level 1 both so she could use up some lovely, patterned scraps looking for a home and so our Embrilliance family could create a quickly-finished decoration to doll up any holiday display!

There’s more than one Way to Applique
There’s rarely a single right way to put a project together, and machine embroidery applique is no exception to that rule. Lisa created 2 versions of this scrappy little tree to help you see the difference between a design made for hand-cutting the applique material in the hoop and one made for pre-cut fabric pieces. We won’t cover every part of each process, but we will go over how the two files get the job done.
Digging into the Download
The zip file linked below contains two .BE working files, each named after how it should be stitched. The “handcut in hoop” file, stitches in an optimal way for those that want to applique in the traditional way, trimming away excess material in the hoop after the tack-down stitch runs. The “precut” file is for those with a cutting machine like Scan N Cut, Silhouette, Juliet, and Cricut for example. This file stitches assuming you cut all of your fabric shapes in advance with their iron-on backing and will fuse them into place once the placement lines stitch. The ‘precut’ file has no tack-down stitches to skip at the machine!

Results don’t Vary
The finished result for both files is the same, the only difference is the way the design stitches. Both versions stitch the placement stitches first for the entire design rather than outlining one piece at a time. Lisa digitized it this way so she could visualize the shape and sized of the applique areas, arranging the fabrics she wanted to use from her robust (no judgment here) “scrap bag”, making sure each piece could cover the intended area. After that step, you’ll notice that each file’s steps are slightly different.

Deciphering the Differences
Color #1 in both files contains the placement lines for ALL pieces. For the “handcut in hoop” version, Each color that stitches next contains a material tack-down stitch for each segment. These tack-down lines have been INSET slightly to ensure that when you carefully trim the excess fabric away, the edge lands roughly at the center of the original placement stitch! This ensures that the satin finishing stitch will fully cover and encase the fabric’s edge. NOTE: As the applique design layers elements from the bottom to the top of the tree, you will not need to trim closely on the upper top edges as they will be covered by the following fabric placement.

Creating the Hand-Cut Version
The “handcut in hoop” version stitches as expected of any traditional applique design. The placement roadmap shows you where all the fabrics go. The material tack-down holds the scrappy fabric in place so you can trim, return the hoop to the machine, and stitch the finishing stitch. The color changes allow for the machine to stop between steps, though there’s no need to change the thread between these steps until you need different colors for the final covering stitches. As you can see above, the ‘object tree’ in the right hand side of your Embrilliance platform window shows how the stitches are laid out in sequence.

Step by Step Plans for Pre-Cut Applique
If you choose the “precut” version, you will see TWO designs in your object tree as seen above. Design 1 is made specifically to create cut files. It has no stitches and will not output to your stitch file. Design 1 only contains lines assigned as Applique Positions. To create the cutting file needed for your cutting machine (SVG, FCM, Studio, etc.), start by selecting Design 1 in the object pane at the right of your screen. Next, go to the properties pane at the bottom right of your screen and left click on any of the color chips. This opens the Thread dialog box as seen in the image above. Once it is open, click the Applique tab. In the Cutting section, choose your inflation value. This value will be used to determine how much larger than the placement line you want all of the line objects to cut. Then choose Save All to save all cut lines for this design in one cutting file. Make sure to select the proper file format for your cutter. You now open that cutting file into your cutter’s software to create the pre-cut fabric pieces.

Starting to Stitch
You can now save and send the “precut” embroidery file to your embroidery machine. Make sure you are not using use the “hand cut in hoop” file. You will not need delete anything. Simply go to File > Save Stitch file or Utility > Wifi to Brother/Babylock if your machine supports WiFi transfer. The line objects have no stitches and will not appear in the stitch file.
Placement and Pressing
With your pre-cut fabric shapes at the ready, you can now stitch Color #1; the placement guide. We’ll start by fusing the trunk of our tree into its placement area on our design, as it will finish before the other elements. You’ll notice that the “precut” design contains no ‘tackdown’ stitches, as your precut shapes are fused in place and needed no additional stitching to stay put!

Stitch the finishing stitches for the trunk, and only after they are complete, fuse all of your shapes for the main body of the tree into their stitched placement lines.

Go on to stitch the finishing stitches for the tree, then place and fuse your star. Once it’s on, you can stitch the last steps to finish the design!

The design is provided in our native .BE format, enabling you to save a stitch file for any embroidery machine. If you aren’t already an Embrilliance owner, we provide a free method to use our software called Express Mode. It will not only allow you to use any of the wonderful free designs found in our project blog, but also lets you install and create basic text treatments with fonts distributed in our popular .BX format produced by many embroidery design creators.