
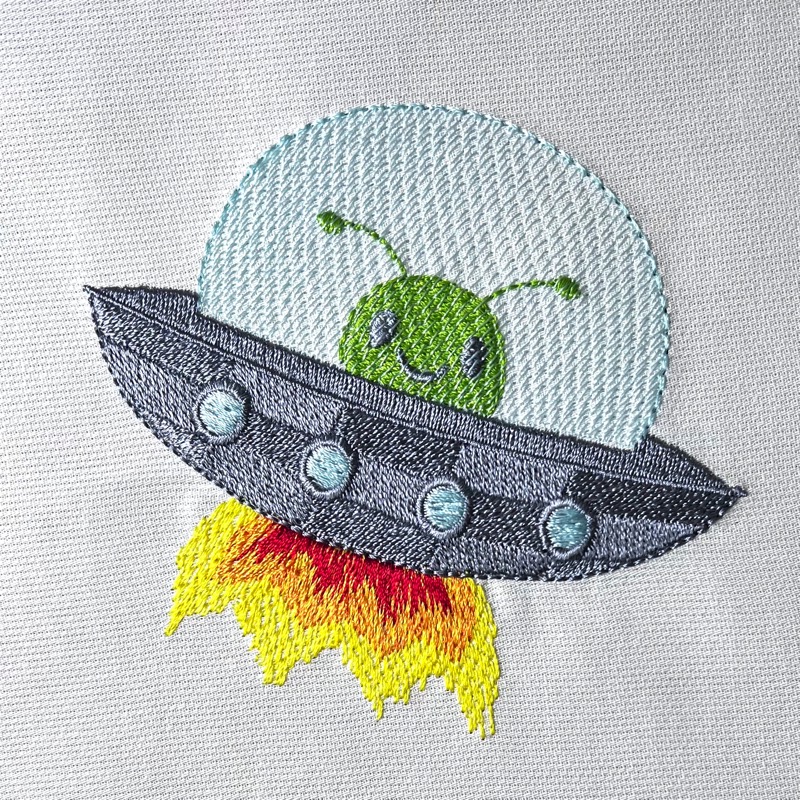
Sometimes a design just comes together; sometimes it takes a little experimenting, a little second-guessing, and a whole lot of “what happens if I try this?” This alien design was created by our friend Lisa Shaw. She was in an experimental mood while watching the launch and journey of the Artemis II this month and made our friend in the flying saucer. Gazing into the sky, one can’t help but think of what’s really out there in the stars for us to imagine and discover.
👽 The Magic Isn’t Always More Thread

At first glance, the body of the spaceship looks like it’s stitched with two different thread colors. Plot twist: it’s not. This is all about stitch angle. Inspiration for this technique came from watching episodes from our friend Erich Campbell’s TakeUp that highlight the light effects of stitch angles. Especially his take on single-color designs and texture and this one on pixel art, as well as the Japanese Tatami Floormat artist he shared during one of his lives.
✨ Stitch Angle = Instant Texture Upgrade

Instead of changing thread colors to get the look of color variation in the panels on my UFO, I created rectangular objects with alternating stitch angles. \
You’ll notice that you get ‘free’ visual interest without adding color changes or extra stitches in comparison to a normal, flat fill.
👉 Same thread
👉 Same fill type
👉 Completely different look
Why it works:
Light hits and reflects off of stitches differently depending on direction. That alteration of reflection creates the illusion of depth and color change — without a single extra stop at the machine.
Translation:
More visual interest, less machine babysitting. Win!
🔍 That “Glass Dome” Isn’t Magic… It’s Density
You may have noticed that the UFO’s dome looks transparent — but we didn’t suddenly turn thread into glass. It’s a matter of opening up the density by using a simple automatic setting.

The dome was created with a light-density fill with an open center gradient (hello StitchArtist Level 2 👋). With your fill object selected, all you have to do is click the ‘Add a Gradient‘ button in the Fill tab of the Properties panel as shown in the above image, select ‘Open Center’ in the gradient type drop-down menu, and adjust the ‘density’ setting to your liking. For this piece, Lisa chose 1mm spacing.
What’s happening here:
- Lower density lets fabric (or in this case our “stitched alien”) show through
- Open center gradient reduces stitches toward the middle
- The result = soft, airy, “see-through” effect
The best part? You can tweak it endlessly until it looks just right.
🔥 Flames That Behave… and Flames That Don’t
Let’s talk about the flame — this is where things get fun!

We used feathering on a satin column (another StitchArtist L2 goodie), and we applied it to both sides. You can do the same by selecting your satin column object, clicking the ‘Feather the Column’ button in the Satin tab of the Properties panel as shown above, and adjusting the ‘Feather’ settings in the panel. In this example, Lisa has chosen to feather the left side of the column (here on the top of the red flame) at 18% with 0% extension beyond the border, whereas the right side of the column (the bottom of the red flame) is feathered at 20% with 26% extension beyond the object border.
Now here’s the part most people miss:
👉 The side immediately UNDER the spaceship is feathered simply to reduce bulk
👉 The visible edge is feathered for that wild, flame texture and blending.
Why this matters:
- Less bulk = fewer “mystery lumps” during stitching
- More texture = way more visual movement
This flame may look cool, but it’s also doing some heavy lifting behind the scenes to make the design run well and stay light.
💡 A Few Takeaways You Can Put to Good Use in YOUR Projects
- Stitch angle can replace color changes and add visual interest
- Density is your secret weapon for dimension
- Gradients aren’t just pretty—they’re powerful
- Feathering isn’t just decorative—it solves problems
🧵 Final Thoughts🚀👽
This little UFO is a perfect example of what I love about machine embroidery:
It’s not just about stitches—it’s about how those stitches behave.
Once you start playing with things like angle, density, gradients, and feathering, you realize you can create a LOT more visual interest than you thought, and all without making your embroidery time more complicated.
The design is provided in our native .BE format, enabling you to save a stitch file for any embroidery machine. If you aren’t already an Embrilliance owner, we provide a free method to use our software called Express Mode. It will not only allow you to use any of the wonderful free designs found in our project blog, but also lets you install and create basic text treatments with fonts distributed in our popular .BX format produced by many embroidery design creators.