

Patches for Popular Personalization
If you find yourself wandering through any big box store’ Back to School section, you already know how popular it is to personalize with patches! We saw people collecting up these little patches with glee and it gave us the great idea to give you guys some further patch freebies! Our own Erich felt so compelled to discuss this embroidery-focused trend that the latest episode of his The TakeUp live-stream podcast dove in to how these trends can be utilized by embroiderers who sell and those who just want to join in on the fun. He had a great time sharing the wonders of PatchArtist while he shared tome tactics and tips.

Easy Patches to Pump up your Collection
Over the years we have given out many patch libraries from seasonal skulls to fun back-to-school themed patches; this year we are adding one more for your customization collection and providing you with an awesome update to our earlier offerings! Hence the ‘Easy Patch’ library was born!


Working with Words
One of the predominant themes of the patches we saw in the wild was word art! Stylized words, acronyms and fun sayings made with a fun font were all over! You can easily make the same with a word and font of your choice, it’s little more than type your word, tweak if you like, add a page wrap from PatchArtist in 2 clicks, and BOOM! you’ve got a cool patch that you can customize using the Interactive tab. We recently showed this in the Liberty Bell patch blog post if you need a quick refresher! Looking for more step by step instructions on the interactive tab – check out the PDF Supplement from our downloads page!
To show how easy it is to create the stylized lettering, Lisa created the short video below to show exactly how she styled her words and phrases. Embrilliance’s text tools make it effortless to get creative!
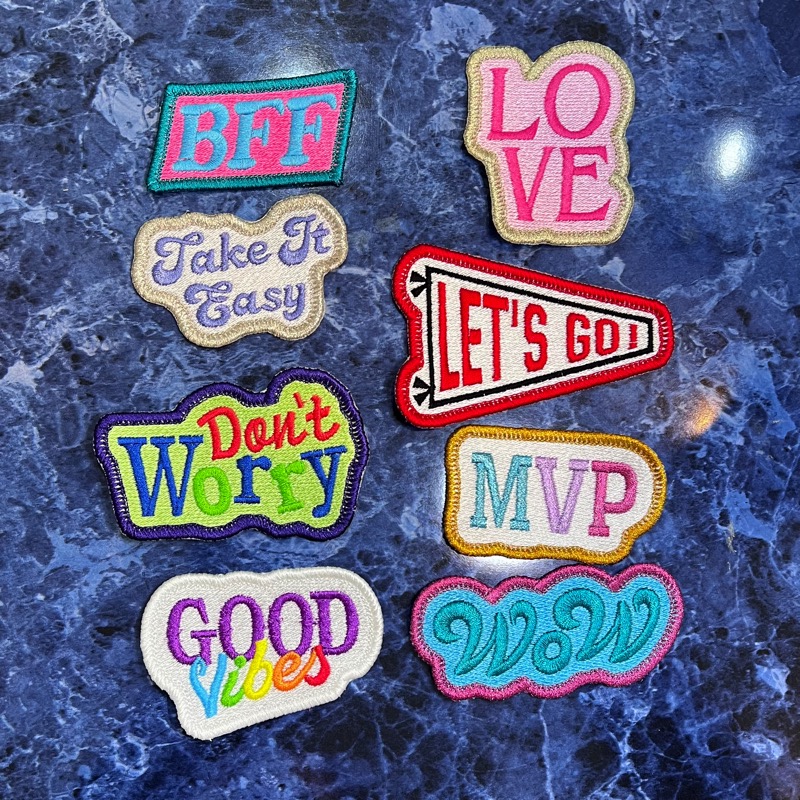
Lisa had a whole lot of fun sizing, rotating, and placing letters to make the wacky little word-art wonders that became part of our Easy Patch Library. Once Lisa saw all of her awesome stitch-outs, she wanted to take it even a step further, so she had Erich add an additional customizable version of her Pennant Patch pre-loaded with our own Block font so that anyone who downloads these designs can get a chance to type out their own name, team name, or short phrase for a truly custom piece! Moreover, he reached back into the historical project blog to make interactive versions of all Lisa’s earlier ‘Back to School Cool’ patches that could be updated, so that you can make almost all of them in any fabric or stitch-backed style you like! Get them all below!


For more info on installing libraries or using the interactive patch tab, read on!
Installing the Design Library
This design library installs like any other BX installer you may have used, but if you need a bit of extra help, Here’s a PDF guide with installation instructions. If you haven’t yet installed a BX font or library, you may want to watch the following video that shows how these wonderful installers make adding fonts and design collections to your Embrillliance software easy!
NOTE: the most common error/trouble that people have when trying to install a BX file is that they skip the unzipping step! It is easy to do because Windows File Explorer shows you the contents to extract just like any other folder. However, in order to install a BX file, it must not be inside the compressed file

Adding Library Designs
You may be familiar with BX installation files from the wealth of fonts available from top digitizers, but this BX installs something a little differently. BX Libraries are not fonts, but design collections. Instead of showing up in the ‘Font’ pane of the Lettering tool, Library designs are accessed via the Merge Library Design button on your button bar.

Once you’ve started new design page and click the Merge Library Design button, the Library window will appear. To access the designs once you’ve opened the Library, select the Embrilliance: Project Blog category in the Catalog drop-down menu in the upper left and click on the ‘Easy Patches’ or Back to School icons in the left hand panel.

Once you see the designs in the right-hand pane, click and select the design you would like to use then click the OK button above the panel. The design will show up in the center of your hoop on your current design page.
Using the Interactive Tab
Erich published these designs with all the options unlocked, so you can create them with fills or fabric, no matter how you cut your patches! Anyone with any level of Embrilliance can alter the settings. Just, select the design in the Object pane and you’ll be able to choose your patch-making style. NOTICE the Interactive Tab in the properties pane. This is where you can make the call! Check out the section on Patch Creation in the PatchArtist Supplemental PDF for information on the settings and patch-making styles. This PDF file also contains stitching guidance as well as some background information on patch making in general.

If you have StitchArtist Level 3, you can right click on the design in the Display pane and choose Convert to Objects. This gives you access to the native objects from the working file, meaning you can see how the design was digitized! You have complete access to all objects, their properties, their stitching order, etc.
If you aren’t already an Embrilliance owner, we provide a free method to use our software called Express Mode that will not only allow you to use any of the wonderful free designs found in our project blog, but also enables you to install and create basic text treatments with fonts distributed in our popular .BX format produced by many embroidery design creators.
To learn more about Embrilliance Express and for the instructions and links you need to download, install, and use our software with our free project files, please click here.